Netty框架探索:助力高效网络编程
一、Netty是个啥?
Netty is *an asynchronous event-driven network application framework*
for rapid development of maintainable high performance protocol servers & clients.
Netty是一个异步的、基于事件驱动的网络应用框架,用于快速开发可维护、高性能的网络服务器和客户端。
Netty在Java网络应用框架中的地位就好比——Spring框架在JavaEE开发中的地位。哪些框架使用了Netty?Dubbo、gRPC、Spring5、Zookeeper、RocketMQ、ElasticSearch、Hadoop、Spark、Cassandra等,因为它们都有网络通信需求。
他还是另一个著名网络应用框架 Mina 的重要贡献者
既然有了 Java NIO,而且 Netty 也是基于 Java NIO 实现,那么为什么不能直接用 Java NIO 来实现网络通信模块呢?
如果我们用 Java NIO 来开发网络通信组件,势必会直接面对很多网络通信的问题。比如,网络连接异常如何处理、网络的闪断怎么处理、网络拥堵、拆包粘包等一大堆网络通信的问题。同时还会面临性能优化的问题,比如成熟的中间件为了提升通信性能,以及提升处理请求量,会设计成 reactor 模式。所以,直接用 Java NIO 做通信模块,会有很多的生产环境的问题等待我们去处理,大部分经验并不是很资深的同学是很难实现的。
但对比下来,Netty 开发通信组件则有很多优势。
- 首先,Netty 简化了 Java NIO 的 API,封装了底层很多复杂的网络通细节,让我们开发程序变得很简单。
- 其次,Netty 还提供了很多的高级功能,易于二次扩展。
- 最重要的是,优秀的 Netty 设计实现了高性能、高并发、高吞吐、高可靠的网络通信。
- 最后,大量的商业项目都使用了 Netty 作为网络通信模块,比如,Dubbo、RocketMQ。经过很多生产环境的验证后,Netty 可以说是 Java 软件里最成熟、最流行的网络通信模块。
但是 Netty 也是有劣势的,Netty 为了更好地封装 Java NIO 创造了很多抽象的概念,这些抽象概念对于初学者来说难度并不小。
总体来说,Netty 相对于 Java NIO 确实更加完善和健壮,但是也难于理解。
二、“Hello World”
下面是一个简单的例子,演示了如何使用Netty框架开发一个简单的服务器端和客户端,其中客户端向服务器端发送 “hello, world”,而服务器端仅接收消息而不返回
开始之前先引入netty的依赖
<dependency>
    <groupId>io.netty</groupId>
    <artifactId>netty-all</artifactId>
    <version>4.1.39.Final</version>
</dependency>
服务器端实现(Server)
public class HelloServer {
    public static void main(String[] args) {
        // 1. 启动器,负责组装 netty 组件,启动服务器
        new ServerBootstrap()
                // 2. 处理网络的EventLoopGroup(事件循环组)
                .group(new NioEventLoopGroup())
                // 3. 选择实现类
                .channel(NioServerSocketChannel.class)
                // 4. boss负责处理连接,worker(child)负责处理读写,决定了worker(child)能执行哪些操作(handler)
                .childHandler(
                        // 5. channel 代表和客户端进行数据读写的通道,Initializer初始化,负责添加别的 handler
                        new ChannelInitializer<NioSocketChannel>() {
                            @Override
                            protected void initChannel(NioSocketChannel nioSocketChannel) throws Exception {
                                // 6. 添加具体 handler
                                nioSocketChannel.pipeline().addLast(new StringDecoder());   // 将ByteBuf 转换为 字符串
                                nioSocketChannel.pipeline().addLast(new ChannelInboundHandlerAdapter() { // 自定义 handler
                                    @Override
                                    public void channelRead(ChannelHandlerContext ctx, Object msg) throws Exception {
                                        System.out.println(msg);
                                    }
                                });
                            }
                        })
                // 7. 绑定端口
                .bind(8080);
    }
}
代码解读~
-
1 处,创建服务端启动类 ServerBootstrap,其内部封装了各个组件,用来进行服务端的启动;
-
2 处,创建 NioEventLoopGroup 用来进行事件处理,可以简单理解为
线程池 + Selector后面会详细展开; -
3 处,指定服务端的 Channel 类型为 NioServerSocketChannel,NioServerSocketChannel 表示基于 NIO 的服务器端实现,其它实现还有;

-
4 处,为啥方法叫 childHandler?那是因为接下来添加的处理器都是给 SocketChannel 用的,而不是给 ServerSocketChannel;
- 5 处,创建 ChannelHandler, ChannelInitializer 处理器(仅执行一次),它的作用是待客户端 SocketChannel 建立连接后,执行 initChannel 以便添加更多的处理器;
- 6 处,添加具体的 handler,其中第一个是SocketChannel 的处理器,解码 ByteBuf => String,第二个是自定义的业务处理器,使用上一个处理器的处理结果;
- 5 处,创建 ChannelHandler, ChannelInitializer 处理器(仅执行一次),它的作用是待客户端 SocketChannel 建立连接后,执行 initChannel 以便添加更多的处理器;
-
7 处,ServerSocketChannel 绑定的监听端口。
客户端实现(Client)
public class HelloClient {

    public static void main(String[] args) throws InterruptedException {
        // 1. 启动类
        new Bootstrap()
                // 2. 添加EventLoop
                .group(new NioEventLoopGroup())
                // 3. 选择客户端 channel 是心啊
                .channel(NioSocketChannel.class)
                // 4. 添加处理器
                .handler(new ChannelInitializer<NioSocketChannel>() {
                    // 初始化器会在连接建立后调用
                    @Override
                    protected void initChannel(NioSocketChannel ch) throws Exception {
                        // 将字符串 转换为 ByteBuf
                        ch.pipeline().addLast(new StringEncoder());
                    }
                })
                // 5. 连接服务器
                .connect(new InetSocketAddress("127.0.0.1", 8080))
          			// 6. 异步等待 connect 建立连接完毕
                .sync()
          			// 7. 获取 channel 对象
                .channel()
                // 8. 向服务端发送数据
                .writeAndFlush("hello,world");
    }

}
代码解读~
-
1 处,创建启动器,同 Server
-
2处,group() 指定一个 NioEventLoopGroup 实例,用来处理客户端连接的建立和后续事件处理
-
3 处,选择客户 Socket 实现类,NioSocketChannel 表示基于 NIO 的客户端实现,其它实现还有

-
4 处,添加 SocketChannel 的处理器,ChannelInitializer 处理器(仅执行一次),它的作用是待客户端 SocketChannel 建立连接后,执行 initChannel 以便添加更多的处理器
-
5 处,指定要连接的服务器和端口
-
6 处,Netty 中很多方法都是异步的,如 connect,这时需要使用 sync 方法等待 connect 建立连接完毕
-
7 处,获取 channel 对象,它即为通道抽象,可以进行数据读写操作
-
8 处,写入消息并清空缓冲区
-
消息会经过通道 handler 处理,这里是将 String => ByteBuf 发出
-
数据经过网络传输,到达服务器端,服务器端 6 处的 handler 先后被触发,走完一个流程
思考🤔
💡不妨这样理解
- 将 channel 理解为数据的通道;
- 把 msg 理解为流动的数据,最开始输入是 ByteBuf,但经过 pipeline(管道)的加工,会变成其他类型的对象,最后输出又变成 ByteBuf;
- 把 handler 理解为数据的处理工序
- pipeline(管道)中有多道工序,pipeline负责发布事件传播给每个handler,handler对自己感兴趣的事件进行处理(重写了响应时间处理方法)
- handler 分 Inbound 和 OutBound 两类
- 把 eventLoop 理解为处理数据的工人
- 工人可以管理多个 channel 的 io 操作,并且一旦工人负责了某个 channel,就要负责到底(绑定);
- 工人既可以执行 io 操作,也可以进行任务处理,每位工人有任务队列,队列里可以堆放多个 channel 的待处理任务,任务分为普通任务、定时任务;
- 工人按照 pipeline 顺序,依次按照 handler 的规划处理数据,可以为每道工序制定不同的工人。
三、Netty的核心组件
EventLoop
EventLoop,即"事件循环对象",本质是一个单线程执行器(同时维护了一个 Selector),里面有run方法处理 Channel 上源源不断的 io 事件。EventLoop它的继承关系比较复杂
- 继承
java.util.concurrent.ScheduledExecutorService,因此包含了线程池中所有方法 - 继承netty自身的
OrderedEventExecutor,它提供了boolean inEventLoop(Thread thread);方法判断一个线程是否属于此 EventLoop,EventLoopGroup parent();方法查看自己属于哪个 EventLoopGroup。
EventLoopGroup,即“事件循环组”,是一组 EventLoop,channel 一般会调用 EventLoopGroup 的 register 方法来绑定其中一个 EventLoop,后续这个 channel 上的io事件都由此 EventLoop 来处理(保证了 io 事件处理时的线程安全)。EventLoopGroup继承 netty 自己的 EventExecutorGroup,实现了 Iterable 接口提供遍历 EventLoop 的能力,另有 next() 方法获取集合中下一个 EventLoop。
深入探索EventLoop的高效事件循环Netty—EventLoop
Channel
Netty 中的 Channel 可以看成网络编程中的 Socket,其提供了一系列 IO 操作的 API,比如 read、write、bind、connect 等,大大降低了直接使用 Socket 类的复杂性。同时也包含了 Netty 框架相关的一些功能,包括获取 Channel 的 EventLoop,获取缓冲区分配器 ByteBufAllocator 和 pipeline 等。
深入剖析Netty的Channel:灵活可扩展的网络通道Netty-Channel
ChannelPipeline
ChannelPipeline 也是 Netty 中的一个比较重要的组件,从上面的 Channel 实例化过程可以看出,每一个 Channel 实例中都会包含一个对应的 ChannelPipeline 属性。ChannelPipeline维护着处理或拦截channel的进站事件和出站事件的双向链表,事件在ChannelPipeline中流动和传递,可以增加或删除ChannelHandler来实现对不同业务逻辑的处理。通俗的说,ChannelPipeline是工厂里的流水线,ChannelHandler是流水线上的工人。
探索Netty的ChannelPipeline:构建灵活处理流程控制的关键组件Netty-ChannelPipeline
ChannelHandler
ChannelHandler 基于责任链模式实现,负责对IO事件进行拦截和处理, 也可以终止事件的传递。ChannelHandler 有两个重要的子接口:ChannelInboundHandler和ChannelOutboundHandler,分别拦截入站和出站的各种 I/O 事件。
探索Netty的ChannelHandler:拦截、处理和终止IO事件的关键组件Netty—ChannelHandler
ByteBuf
ByteBuf 是 Netty 中的字节容器,它类似于 Java 中的 ByteBuffer,但是提供了更强大、更灵活的功能。ByteBuf 是一个可扩展的、可读写的字节容器,可以动态地分配和释放内存,支持零拷贝技术,同时具备高效的读写操作和内存管理能力。
探索Netty的ByteBuf:高性能、可扩展的字节容器与零拷贝技术Netty—ByteBuf
Future & Promise
在异步处理时,经常用到这两个接口。首先要说明 netty 中的 Future 与 jdk 中的 Future 同名,但是两个接口,netty 的 Future 继承自 jdk 的 Future,而 Promise 又对 netty Future 进行了扩展。
深入理解Netty的Future和Promise:异步编程的关键手段与结果处理Netty—Future&Promise
四、源码探究Netty对NIO网络编程的实现🔍
服务端的初始化
// 1、创建Selector多路复用器
Selector selector = Selector.open();
// 2、创建服务端的Socket通道,ServerSocketChannel
ServerSocketChannel serverSocketChannel = ServerSocketChannel.open();
// 3、设置为非阻塞
serverSocketChannel.configureBlocking(false);
// 4、绑定端口
serverSocketChannel.socket().bind(new InetSocketAddress(8080));
// 5、把ServerSocketChannel注册到Selector上,并且监听客户端的连接时间操作
serverSocketChannel.register(selector, SelectionKey.OP_ACCEPT);
以上是nio中关于服务端初始化的简易代码编写,netty中关于服务端的初始化大致如下!
//1 netty 中使用 NioEventLoopGroup (简称 nio boss 线程)来封装线程和 selector
Selector selector = Selector.open();

//2 创建 NioServerSocketChannel,同时会初始化它关联的 handler,以及为原生 ssc 存储 config
NioServerSocketChannel attachment = new NioServerSocketChannel();

//3 创建 NioServerSocketChannel 时,创建了 java 原生的 ServerSocketChannel
ServerSocketChannel serverSocketChannel = ServerSocketChannel.open();
serverSocketChannel.configureBlocking(false);

//4 启动 nio boss 线程执行接下来的操作

//5 注册(仅关联 selector 和 NioServerSocketChannel),未关注事件
SelectionKey selectionKey = serverSocketChannel.register(selector, 0, attachment);

//6 head -> 初始化器 -> ServerBootstrapAcceptor -> tail,初始化器是一次性的,只为添加 acceptor

//7 绑定端口
serverSocketChannel.bind(new InetSocketAddress(8080));

//8 触发 channel active 事件,在 head 中关注 op_accept 事件
selectionKey.interestOps(SelectionKey.OP_ACCEPT);
接下来通过源码解读的方式来证实以上初始化流程~
首先 1处Selector的初始化动作是在 eventLoop 初始化时做了,这里不做讲解,感兴趣的可以看Netty—EventLoop!另外四步都是在 bind() 方法中
我们以为 io.netty.bootstrap.ServerBootstrap#bind入口,深入下去直至: io.netty.bootstrap.AbstractBootstrap#doBind
private ChannelFuture doBind(final SocketAddress localAddress) {
	// 1. 执行初始化和注册 regFuture 会由 initAndRegister 设置其是否完成,从而回调 3.2 处代码
    final ChannelFuture regFuture = initAndRegister();
    final Channel channel = regFuture.channel();
    if (regFuture.cause() != null) {
        return regFuture;
    }

    // 2. 因为是 initAndRegister 异步执行,需要分两种情况来看,调试时也需要通过 suspend 断点类型加以区分
    // 2.1 如果已经完成
    if (regFuture.isDone()) {
        ChannelPromise promise = channel.newPromise();
        // 3.1 立刻调用 doBind0
        doBind0(regFuture, channel, localAddress, promise);
        return promise;
    }
    // 2.2 还没有完成
    else {
        final PendingRegistrationPromise promise = new PendingRegistrationPromise(channel);
        // 3.2 回调 doBind0
        regFuture.addListener(new ChannelFutureListener() {
            @Override
            public void operationComplete(ChannelFuture future) throws Exception {
                Throwable cause = future.cause();
                if (cause != null) {
                    // 处理异常...
                    promise.setFailure(cause);
                } else {
                    promise.registered();
					// 3. 由注册线程去执行 doBind0
                    doBind0(regFuture, channel, localAddress, promise);
                }
            }
        });
        return promise;
    }
}
1、initAndRegister
initAndRegister主要做了以下两步(其中【执行的线程】)
1、初始化
- 【main】创建
NioServerSocketChannel- 【main】向 NioServerSocketChannel 的 pipeline 上添加 初始化handler
- 初始化handler等待调用,该方法中主要是向NioServerSocketChannel的pipeline上添加
ServerBootstrapAcceptor,该处理器用作于 accept 事件发生后建立链接!2、注册
- 【main】启动 nio boos 线程
- 【nio-thread】将原生 ServerSocketChannel 注册至 selector,且未关注事件,附件为 NioServerSocketChannel
- 【nio-thread】执行 NioServerSocketChannel 的 pipeline 的初始化handler(即1.2处)
关键代码 io.netty.bootstrap.AbstractBootstrap#initAndRegister,首先通过反射的方式创建了 netty 的 channel,即实现2处。
final ChannelFuture initAndRegister() {
    Channel channel = null;
    try {
      	// 1、初始化
      	// 1.1 通过反射的方式创建 NioServerSocketChannel
        channel = channelFactory.newChannel();
        // 1.2 初始化 - 做的事就是添加一个初始化器 ChannelInitializer
        init(channel);
    } catch (Throwable t) {
        // ...
        return new DefaultChannelPromise(new FailedChannel(), GlobalEventExecutor.INSTANCE).setFailure(t);
    }

    // 2、 注册 - 做的事就是将原生 channel 注册到 selector 上
    ChannelFuture regFuture = config().group().register(channel);
    if (regFuture.cause() != null) {
        // ...
    }
    return regFuture;
}
channel = channelFactory.newChannel()处通过反射的方式创建 channel,这里的channel为NioServerSocketChannel!(对这里有疑惑的小伙伴可以看另一文的Channel初始化流程——Netty—Channel)
接着调用 io.netty.bootstrap.ServerBootstrap#init 方法初始化该 channel,为其通道中添加初始化器handler!
void init(Channel channel) throws Exception {
    final Map<ChannelOption<?>, Object> options = options0();
    synchronized (options) {
        setChannelOptions(channel, options, logger);
    }

    final Map<AttributeKey<?>, Object> attrs = attrs0();
    synchronized (attrs) {
        for (Entry<AttributeKey<?>, Object> e: attrs.entrySet()) {
            @SuppressWarnings("unchecked")
            AttributeKey<Object> key = (AttributeKey<Object>) e.getKey();
            channel.attr(key).set(e.getValue());
        }
    }

    ChannelPipeline p = channel.pipeline();

    final EventLoopGroup currentChildGroup = childGroup;
    final ChannelHandler currentChildHandler = childHandler;
    final Entry<ChannelOption<?>, Object>[] currentChildOptions;
    final Entry<AttributeKey<?>, Object>[] currentChildAttrs;
    synchronized (childOptions) {
        currentChildOptions = childOptions.entrySet().toArray(newOptionArray(0));
    }
    synchronized (childAttrs) {
        currentChildAttrs = childAttrs.entrySet().toArray(newAttrArray(0));
    }

    // 为 NioServerSocketChannel 添加初始化器
    p.addLast(new ChannelInitializer<Channel>() {
        @Override
        public void initChannel(final Channel ch) throws Exception {
            final ChannelPipeline pipeline = ch.pipeline();
            ChannelHandler handler = config.handler();
            if (handler != null) {
                pipeline.addLast(handler);
            }

            // 初始化器的职责是将 ServerBootstrapAcceptor 加入至 NioServerSocketChannel
            ch.eventLoop().execute(new Runnable() {
                @Override
                public void run() {
                    pipeline.addLast(new ServerBootstrapAcceptor(
                            ch, currentChildGroup, currentChildHandler, currentChildOptions, currentChildAttrs));
                }
            });
        }
    });
}
注册
回到initAndRegister方法往下走,接着将执行ChannelFuture regFuture = config().group().register(channel)。
进入 io.netty.channel.AbstractChannel.AbstractUnsafe#register 方法中,首先调用eventLoop.inEventLoop()方法判断当前线程是否是eventLoop线程,否则执行 execute 方法创建一个新的线程去执行register0()方法。
public final void register(EventLoop eventLoop, final ChannelPromise promise) {
    // 一些检查,略...

    AbstractChannel.this.eventLoop = eventLoop;

    if (eventLoop.inEventLoop()) {
        register0(promise);
    } else {
        try {
            // 首次执行 execute 方法时,会启动 nio 线程,之后注册等操作在 nio 线程上执行
            // 因为只有一个 NioServerSocketChannel 因此,也只会有一个 boss nio 线程
            // 这行代码完成的事实是 main -> nio boss 线程的切换
            eventLoop.execute(new Runnable() {
                @Override
                public void run() {
                    register0(promise);
                }
            });
        } catch (Throwable t) {
            // 日志记录...
            closeForcibly();
            closeFuture.setClosed();
            safeSetFailure(promise, t);
        }
    }
}
进入 io.netty.channel.AbstractChannel.AbstractUnsafe#register0 ,该方法主要执行了注册channel,回调NioServerSocketChannel 初始化器的,以及设置成功promise。
private void register0(ChannelPromise promise) {
    try {
        if (!promise.setUncancellable() || !ensureOpen(promise)) {
            return;
        }
        boolean firstRegistration = neverRegistered;
        // 原生的 nio channel 绑定到 selector 上,注意此时没有注册 selector 关注事件,附件为 NioServerSocketChannel
        doRegister();
        neverRegistered = false;
        registered = true;

        // 执行 NioServerSocketChannel 初始化器的 initChannel
        pipeline.invokeHandlerAddedIfNeeded();

        // 为promise设置成功结果,将回调 io.netty.bootstrap.AbstractBootstrap#doBind0
        safeSetSuccess(promise);
        pipeline.fireChannelRegistered();

        // 对应 server socket channel 还未绑定,isActive 为 false
        if (isActive()) {
            if (firstRegistration) {
                pipeline.fireChannelActive();
            } else if (config().isAutoRead()) {
                beginRead();
            }
        }
    } catch (Throwable t) {
        // Close the channel directly to avoid FD leak.
        closeForcibly();
        closeFuture.setClosed();
        safeSetFailure(promise, t);
    }
}
查看真正干活的 io.netty.channel.nio.AbstractNioChannel#doRegister 方法,将原生的 nio channel 绑定到 selector 上,注意此时没有注册 selector 关注事件,附件为 NioServerSocketChannel。
@Override
protected void doRegister() throws Exception {
    boolean selected = false;
    for (;;) {
        try {
            selectionKey = javaChannel().register(eventLoop().unwrappedSelector(), 0, this);
            return;
        } catch (CancelledKeyException e) {
            if (!selected) {
                // Force the Selector to select now as the "canceled" SelectionKey may still be
                // cached and not removed because no Select.select(..) operation was called yet.
                eventLoop().selectNow();
                selected = true;
            } else {
                // We forced a select operation on the selector before but the SelectionKey is still cached
                // for whatever reason. JDK bug ?
                throw e;
            }
        }
    }
}
执行完doRegister方法后,即注册完成,代码执行至pipeline.invokeHandlerAddedIfNeeded()。此时将回调 NioServerSocketChannel 初始化器的 initChannel,即在io.netty.bootstrap.ServerBootstrap#init 方法方法中添加初始化器。该方法主要是向nio ssc通道中加入了 ServerBootstrapAcceptor 执行器,该执行器主要是在 accept 事件发生后建立连接的。
p.addLast(new ChannelInitializer<Channel>() {
    @Override
    public void initChannel(final Channel ch) throws Exception {
        final ChannelPipeline pipeline = ch.pipeline();
        ChannelHandler handler = config.handler();
        if (handler != null) {
            pipeline.addLast(handler);
        }

        // 初始化器的职责是将 ServerBootstrapAcceptor 加入至 NioServerSocketChannel
        ch.eventLoop().execute(new Runnable() {
            @Override
            public void run() {
                pipeline.addLast(new ServerBootstrapAcceptor(
                        ch, currentChildGroup, currentChildHandler, currentChildOptions, currentChildAttrs));
            }
        });
    }
});
2、doBind0
doBind0
1、原生 ServerSocketChannel 绑定 eventLoop线程
2、触发 NioServerSocketChannel active事件
我们回到 io.netty.bootstrap.AbstractBootstrap#doBind 方法中,关于 initAndRegister() 方法是异步去处理的,我们在回调方法中添加了一个监听事件其中调用了doBind0方法。当promise有成功或者失败的时候才会触发!

在 io.netty.channel.AbstractChannel.AbstractUnsafe#register0 方法中我们将该promise设置为成功,将回调回来。
代码 io.netty.bootstrap.AbstractBootstrap#doBind0,使用当前channel绑定的eventloop线程执行bind()方法
private static void doBind0(
        final ChannelFuture regFuture, final Channel channel,
        final SocketAddress localAddress, final ChannelPromise promise) {

    // This method is invoked before channelRegistered() is triggered.  Give user handlers a chance to set up
    // the pipeline in its channelRegistered() implementation.
    channel.eventLoop().execute(new Runnable() {
        @Override
        public void run() {
            if (regFuture.isSuccess()) {
                channel.bind(localAddress, promise).addListener(ChannelFutureListener.CLOSE_ON_FAILURE);
            } else {
                promise.setFailure(regFuture.cause());
            }
        }
    });
}
我们追踪下去直至核心代码io.netty.channel.AbstractChannel.AbstractUnsafe#bind,调用了doBind()方法绑定端口 以及 判断当前channel是否可用,若可用则触发channel的pipeline上所有执行器的 active 事件!
@Override
public final void bind(final SocketAddress localAddress, final ChannelPromise promise) {
    assertEventLoop();

    if (!promise.setUncancellable() || !ensureOpen(promise)) {
        return;
    }

    // See: https://github.com/netty/netty/issues/576
    if (Boolean.TRUE.equals(config().getOption(ChannelOption.SO_BROADCAST)) &&
        localAddress instanceof InetSocketAddress &&
        !((InetSocketAddress) localAddress).getAddress().isAnyLocalAddress() &&
        !PlatformDependent.isWindows() && !PlatformDependent.maybeSuperUser()) {
        // Warn a user about the fact that a non-root user can't receive a
        // broadcast packet on *nix if the socket is bound on non-wildcard address.
        logger.warn(
                "A non-root user can't receive a broadcast packet if the socket " +
                "is not bound to a wildcard address; binding to a non-wildcard " +
                "address (" + localAddress + ") anyway as requested.");
    }

    boolean wasActive = isActive();
    try {
       // 绑定端口
        doBind(localAddress);
    } catch (Throwable t) {
        safeSetFailure(promise, t);
        closeIfClosed();
        return;
    }

    if (!wasActive && isActive()) {
        invokeLater(new Runnable() {
            @Override
            public void run() {
                // 触发channel的pipeline上所有执行器的 active 事件
                pipeline.fireChannelActive();
            }
        });
    }

    safeSetSuccess(promise);
}
io.netty.channel.socket.nio.NioServerSocketChannel#doBind,调用serverSocketChannel绑定端口
@Override
protected void doBind(SocketAddress localAddress) throws Exception {
    if (PlatformDependent.javaVersion() >= 7) {
        javaChannel().bind(localAddress, config.getBacklog());
    } else {
        javaChannel().socket().bind(localAddress, config.getBacklog());
    }
}
走到这里目前pipeline上有 head、ServerBootstrapAcceptor(initAndRegister方法中有讲到噢!)、tail三个handler,我们追踪下去直至核心代码,判断是否关注过 accept事件,若没有则关联!
@Override
protected void doBeginRead() throws Exception {
    // Channel.read() or ChannelHandlerContext.read() was called
    final SelectionKey selectionKey = this.selectionKey;
    if (!selectionKey.isValid()) {
        return;
    }

    readPending = true;

    final int interestOps = selectionKey.interestOps();
    if ((interestOps & readInterestOp) == 0) {
        selectionKey.interestOps(interestOps | readInterestOp);
    }
}
走到这里关于 服务器 大致上就初始化完毕咯🎉🎉🎉
accept 流程
首先我们回顾一下,nio 中 accept 代码,大致分这几个流程
- selector.select() 阻塞直到事件发生
- 遍历处理 selectedKeys
- 拿到一个 key,判断事件类型是否为 accept
- 若是,则创建 SocketChannel,且设置成非阻塞
- 将 SocketChannel 注册至 selector,注册事件为 read 事件
//1 阻塞直到事件发生
selector.select();

Iterator<SelectionKey> iter = selector.selectedKeys().iterator();
while (iter.hasNext()) {
    //2 拿到一个事件
    SelectionKey key = iter.next();

    //3 如果是 accept 事件
    if (key.isAcceptable()) {

        //4 执行 accept
        SocketChannel channel = serverSocketChannel.accept();
        channel.configureBlocking(false);

        //5 关注 read 事件
        channel.register(selector, SelectionKey.OP_READ);
    }
    // ...
}
我们在前面EventLoop专栏中有说过io.netty.channel.nio.NioEventLoop#run 主要任务是执行死循环,不断看有没有新任务,有没有 IO 事件。前三步在该方法中处理,我们点进核心代码``io.netty.channel.nio.NioEventLoop#processSelectedKey(java.nio.channels.SelectionKey, io.netty.channel.nio.AbstractNioChannel)方法,启动客户端注册  接下来两步都在io.netty.channel.nio.AbstractNioMessageChannel.NioMessageUnsafe#read` 方法中处理,我们跟进去
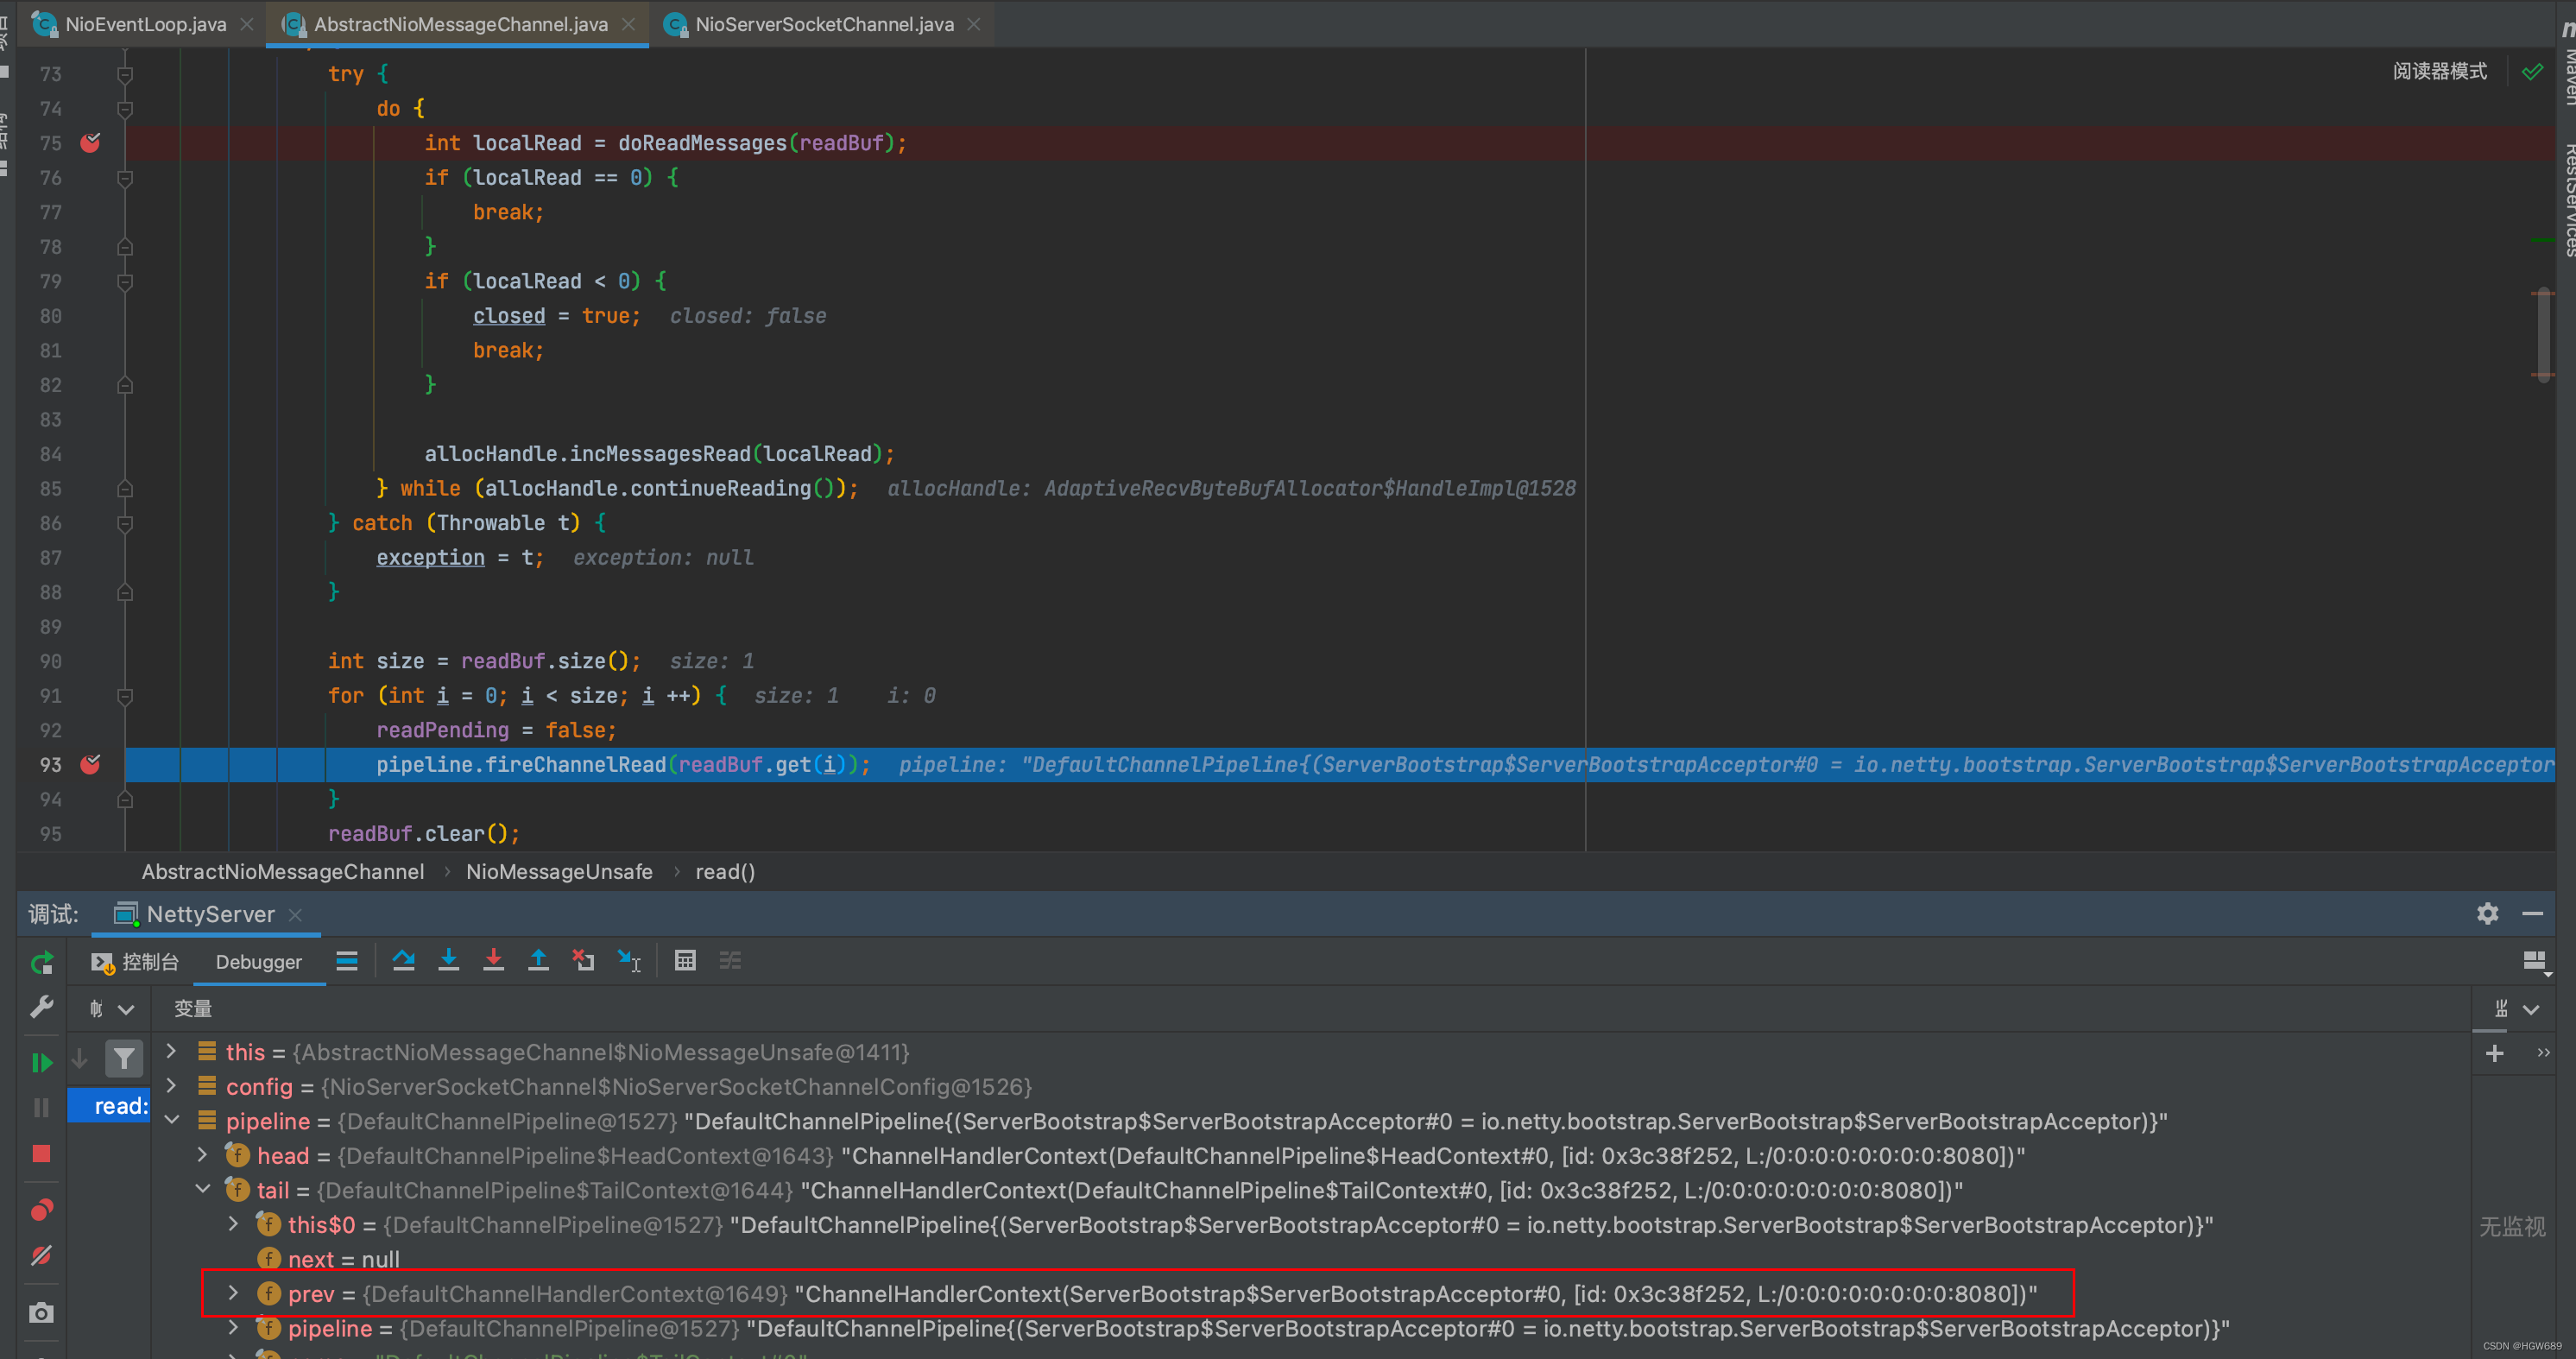
public void read() {
    assert eventLoop().inEventLoop();
    final ChannelConfig config = config();
    final ChannelPipeline pipeline = pipeline();
    final RecvByteBufAllocator.Handle allocHandle = unsafe().recvBufAllocHandle();
    allocHandle.reset(config);

    boolean closed = false;
    Throwable exception = null;
    try {
        try {
            do {
				// doReadMessages 中执行了 accept 并创建 NioSocketChannel 作为消息放入 readBuf,readBuf 是一个 ArrayList 用来缓存消息
                int localRead = doReadMessages(readBuf);
                if (localRead == 0) {
                    break;
                }
                if (localRead < 0) {
                    closed = true;
                    break;
                }
				// localRead 为 1,就一条消息,即接收一个客户端连接
                allocHandle.incMessagesRead(localRead);
            } while (allocHandle.continueReading());
        } catch (Throwable t) {
            exception = t;
        }

        int size = readBuf.size();
        for (int i = 0; i < size; i ++) {
            readPending = false;
            // 触发 read 事件,让 pipeline 上的 handler 处理,这时是处理
            // io.netty.bootstrap.ServerBootstrap.ServerBootstrapAcceptor#channelRead
            pipeline.fireChannelRead(readBuf.get(i));
        }
        readBuf.clear();
        allocHandle.readComplete();
        pipeline.fireChannelReadComplete();

        if (exception != null) {
            closed = closeOnReadError(exception);

            pipeline.fireExceptionCaught(exception);
        }

        if (closed) {
            inputShutdown = true;
            if (isOpen()) {
                close(voidPromise());
            }
        }
    } finally {
        if (!readPending && !config.isAutoRead()) {
            removeReadOp();
        }
    }
}
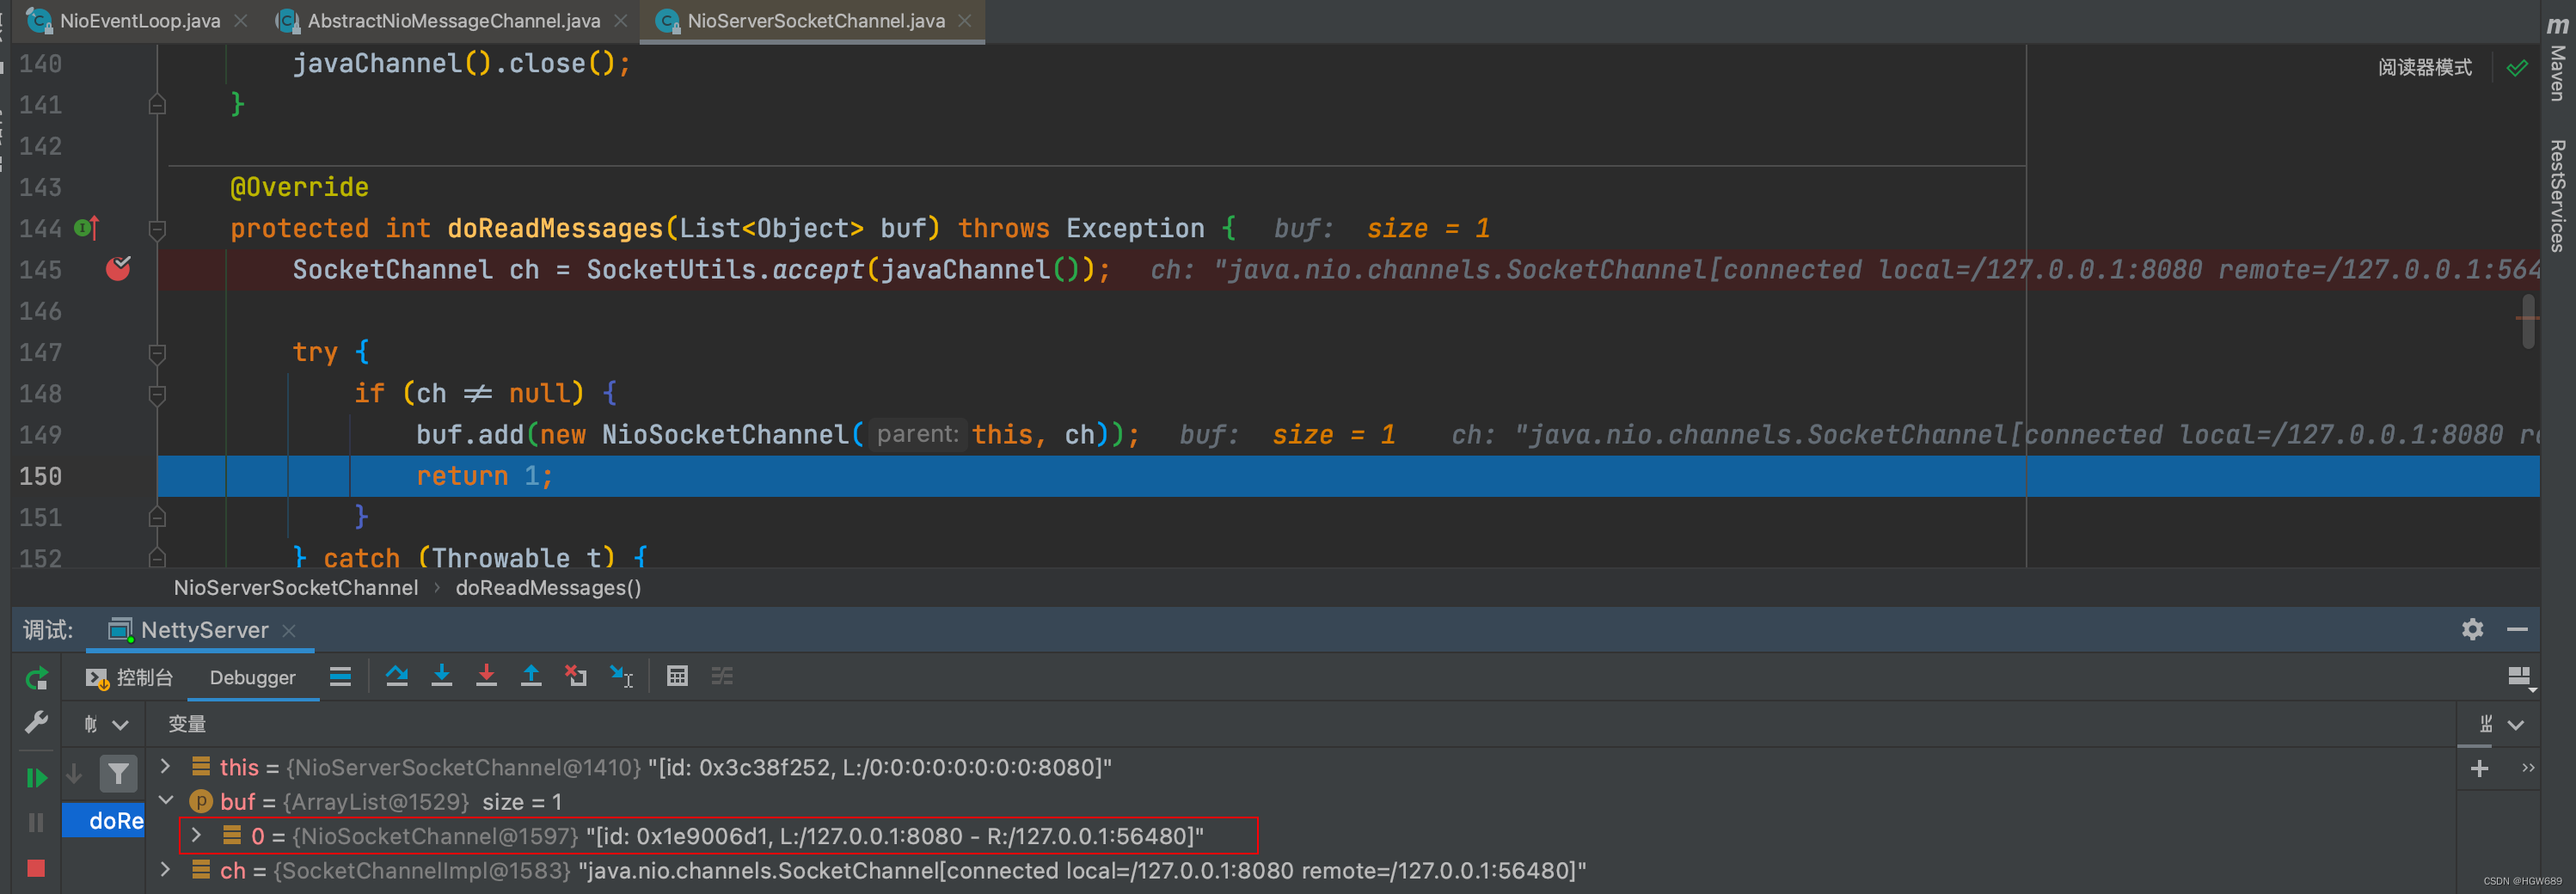
其中首先调用了io.netty.channel.sctp.nio.NioSctpServerChannel#doReadMessages方法,它执行了 accept 操作来创建原生的 SocketChannel。然后,使用该 SocketChannel 创建了 NioSocketChannel 对象,并将其作为消息放入 readBuf 中。值得注意的是,readBuf 是一个 ArrayList ,用来缓存消息。
@Override
protected int doReadMessages(List<Object> buf) throws Exception {
    SocketChannel ch = SocketUtils.accept(javaChannel());

    try {
        if (ch != null) {
            buf.add(new NioSocketChannel(this, ch));
            return 1;
        }
    } catch (Throwable t) {
        logger.warn("Failed to create a new channel from an accepted socket.", t);

        try {
            ch.close();
        } catch (Throwable t2) {
            logger.warn("Failed to close a socket.", t2);
        }
    }

    return 0;
}
doReadMessages 内部, accept 操作来创建原生的 SocketChannel
public static SocketChannel accept(final ServerSocketChannel serverSocketChannel) throws IOException {
    try {
        return AccessController.doPrivileged(new PrivilegedExceptionAction<SocketChannel>() {
            @Override
            public SocketChannel run() throws IOException {
                return serverSocketChannel.accept();
            }
        });
    } catch (PrivilegedActionException e) {
        throw (IOException) e.getCause();
    }
}
doReadMessages内部,io.netty.channel.socket.nio.NioSocketChannel#NioSocketChannel(io.netty.channel.Channel, java.nio.channels.SocketChannel)在 NioSocketChannel 的构造方法中,通过调用父类的构造方法,将底层的SocketChannel设置为非阻塞模式。同时,将readInterestOp设置为SelectionKey.OP_READ`
protected AbstractNioChannel(Channel parent, SelectableChannel ch, int readInterestOp) {
    super(parent);
    this.ch = ch;
    this.readInterestOp = readInterestOp;
    try {
        ch.configureBlocking(false);
    } catch (IOException e) {
        try {
            ch.close();
        } catch (IOException e2) {
            if (logger.isWarnEnabled()) {
                logger.warn(
                        "Failed to close a partially initialized socket.", e2);
            }
        }

        throw new ChannelException("Failed to enter non-blocking mode.", e);
    }
}
NioServerSocketChannel对象维护了一个名为 readBuf 的缓存,它是一个由该对象管理的 ArrayList。当NioServerSocketChannel接收到新的连接请求并成功创建相应的 NioSocketChannel 对象后,它将这个新创建的 NioSocketChannel 对象作为消息放入 readBuf 中。
此时readBuf不为空,调用 pipeline 的 fireChannelRead 方法,将数据读取事件传递给 ChannelPipeline 中下一个处理器的过程
我们已知在服务端初始化时向 pipeline 上添加了ServerBootstrapAcceptor 处理器,我们直接查看 io.netty.bootstrap.ServerBootstrap.ServerBootstrapAcceptor#channelRead 方法
public void channelRead(ChannelHandlerContext ctx, Object msg) {
    // 这时的 msg 是 NioSocketChannel
    final Channel child = (Channel) msg;

    // NioSocketChannel 添加  childHandler 即初始化器
    child.pipeline().addLast(childHandler);

    // 设置选项
    setChannelOptions(child, childOptions, logger);

    for (Entry<AttributeKey<?>, Object> e: childAttrs) {
        child.attr((AttributeKey<Object>) e.getKey()).set(e.getValue());
    }

    try {
        // 注册 NioSocketChannel 到 nio worker 线程,接下来的处理也移交至 nio worker 线程
        childGroup.register(child).addListener(new ChannelFutureListener() {
            @Override
            public void operationComplete(ChannelFuture future) throws Exception {
                if (!future.isSuccess()) {
                    forceClose(child, future.cause());
                }
            }
        });
    } catch (Throwable t) {
        forceClose(child, t);
    }
}
又回到了熟悉的 io.netty.channel.AbstractChannel.AbstractUnsafe#register 方法,进行 nio boss -> nio worker 线程的切换
public final void register(EventLoop eventLoop, final ChannelPromise promise) {
    // 一些检查,略...

    AbstractChannel.this.eventLoop = eventLoop;

    if (eventLoop.inEventLoop()) {
        register0(promise);
    } else {
        try {
            // 这行代码完成的事实是 nio boss -> nio worker 线程的切换
            eventLoop.execute(new Runnable() {
                @Override
                public void run() {
                    register0(promise);
                }
            });
        } catch (Throwable t) {
            // 日志记录...
            closeForcibly();
            closeFuture.setClosed();
            safeSetFailure(promise, t);
        }
    }
}
nio worker 调用 io.netty.channel.AbstractChannel.AbstractUnsafe#register0
private void register0(ChannelPromise promise) {
    try {
        if (!promise.setUncancellable() || !ensureOpen(promise)) {
            return;
        }
        boolean firstRegistration = neverRegistered;
        doRegister();
        neverRegistered = false;
        registered = true;

        // 执行初始化器,执行前 pipeline 中只有 head -> 初始化器 -> tail
        pipeline.invokeHandlerAddedIfNeeded();
        // 执行后就是 head -> logging handler -> my handler -> tail

        safeSetSuccess(promise);
        // 触发 pipeline 上 active 事件
        pipeline.fireChannelRegistered();

        if (isActive()) {
            if (firstRegistration) {
                // 触发 pipeline 上 active 事件
                pipeline.fireChannelActive();
            } else if (config().isAutoRead()) {
                beginRead();
            }
        }
    } catch (Throwable t) {
        closeForcibly();
        closeFuture.setClosed();
        safeSetFailure(promise, t);
    }
}
doRegister() 此处就不做讲解了,服务端初始化过程中有说过。这里就是将原生 SocketChannel 注册至 selector,且未关注事件,附件为 NioSocketChannel。
注意此处的pipeline是NioSocketChannel的pipeline!回到了熟悉的代码 io.netty.channel.DefaultChannelPipeline.HeadContext#channelActive
public void channelActive(ChannelHandlerContext ctx) {
    ctx.fireChannelActive();
	// 触发 read (NioSocketChannel 这里 read,只是为了触发 channel 的事件注册,还未涉及数据读取)
    readIfIsAutoRead();
}
io.netty.channel.nio.AbstractNioChannel#doBeginRead
protected void doBeginRead() throws Exception {
    // Channel.read() or ChannelHandlerContext.read() was called
    final SelectionKey selectionKey = this.selectionKey;
    if (!selectionKey.isValid()) {
        return;
    }

    readPending = true;
	// 这时候 interestOps 是 0
    final int interestOps = selectionKey.interestOps();
    if ((interestOps & readInterestOp) == 0) {
        // 关注 read 事件
        selectionKey.interestOps(interestOps | readInterestOp);
    }
}
read 流程
再来看可读事件 io.netty.channel.nio.AbstractNioByteChannel.NioByteUnsafe#read,注意发送的数据未必能够一次读完,因此会触发多次 nio read 事件,一次事件内会触发多次 pipeline read,一次事件会触发一次 pipeline read complete
public final void read() {
    final ChannelConfig config = config();
    if (shouldBreakReadReady(config)) {
        clearReadPending();
        return;
    }
    final ChannelPipeline pipeline = pipeline();
    // io.netty.allocator.type 决定 allocator 的实现
    final ByteBufAllocator allocator = config.getAllocator();
    // 用来分配 byteBuf,确定单次读取大小
    final RecvByteBufAllocator.Handle allocHandle = recvBufAllocHandle();
    allocHandle.reset(config);

    ByteBuf byteBuf = null;
    boolean close = false;
    try {
        do {
            byteBuf = allocHandle.allocate(allocator);
            // 读取
            allocHandle.lastBytesRead(doReadBytes(byteBuf));
            if (allocHandle.lastBytesRead() <= 0) {
                byteBuf.release();
                byteBuf = null;
                close = allocHandle.lastBytesRead() < 0;
                if (close) {
                    readPending = false;
                }
                break;
            }

            allocHandle.incMessagesRead(1);
            readPending = false;
            // 触发 read 事件,让 pipeline 上的 handler 处理,这时是处理 NioSocketChannel 上的 handler
            pipeline.fireChannelRead(byteBuf);
            byteBuf = null;
        }
        // 是否要继续循环
        while (allocHandle.continueReading());

        allocHandle.readComplete();
        // 触发 read complete 事件
        pipeline.fireChannelReadComplete();

        if (close) {
            closeOnRead(pipeline);
        }
    } catch (Throwable t) {
        handleReadException(pipeline, byteBuf, t, close, allocHandle);
    } finally {
        if (!readPending && !config.isAutoRead()) {
            removeReadOp();
        }
    }
}
io.netty.channel.DefaultMaxMessagesRecvByteBufAllocator.MaxMessageHandle#continueReading(io.netty.util.UncheckedBooleanSupplier)
public boolean continueReading(UncheckedBooleanSupplier maybeMoreDataSupplier) {
    return
           // 一般为 true
           config.isAutoRead() &&
           // respectMaybeMoreData 默认为 true
           // maybeMoreDataSupplier 的逻辑是如果预期读取字节与实际读取字节相等,返回 true
           (!respectMaybeMoreData || maybeMoreDataSupplier.get()) &&
           // 小于最大次数,maxMessagePerRead 默认 16
           totalMessages < maxMessagePerRead &&
           // 实际读到了数据
           totalBytesRead > 0;
}


