文章目录
前言
通过上文分析知道了SpringSecurity对一个请求的具体处理流程。不知道大家是否跟我一样都有几个疑问:
- FilterChainProxy什么时候创建的?
- 过滤器链和对应的过滤器什么时候创建的?
- 怎么把自定义的过滤器添加到过滤器链中?
- 请求和过滤器的匹配规则是什么?
如果有的话,本文将为你解答或消除它们。
加载SpringSecurity配置
上文提到Spring的初始化会加载解析SpringSecurity的配置文件,现在来分析下。
首先系统启动的时候会触发在 web.xml中配置的ContextLoaderListener监听器

然后会执行对应的initWebApplicationContext方法
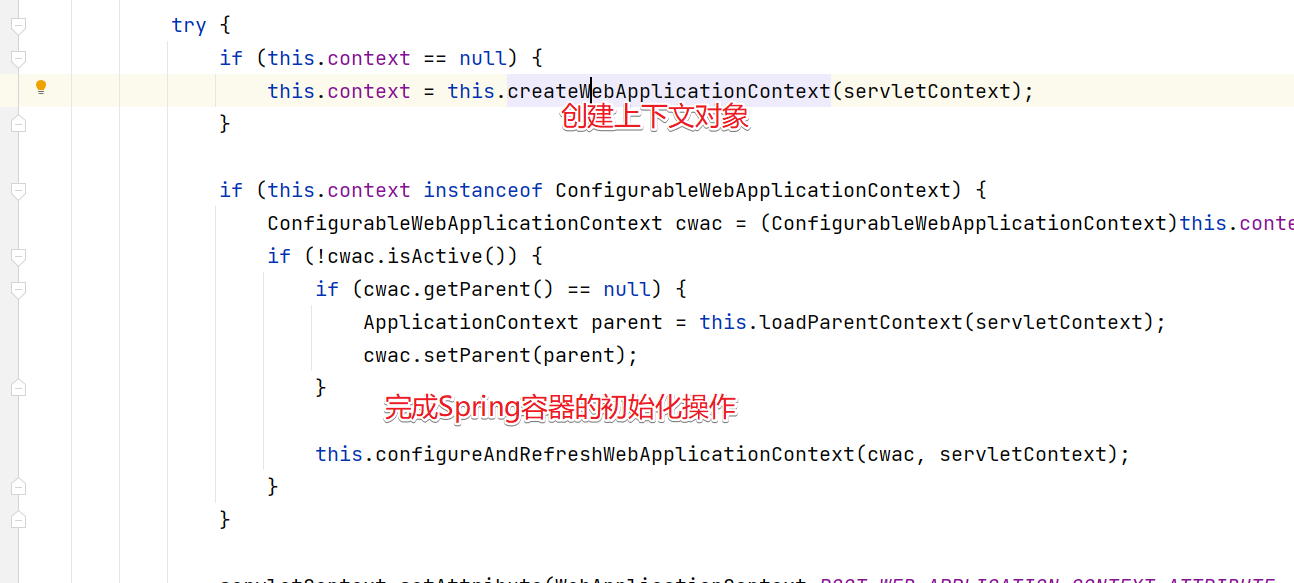
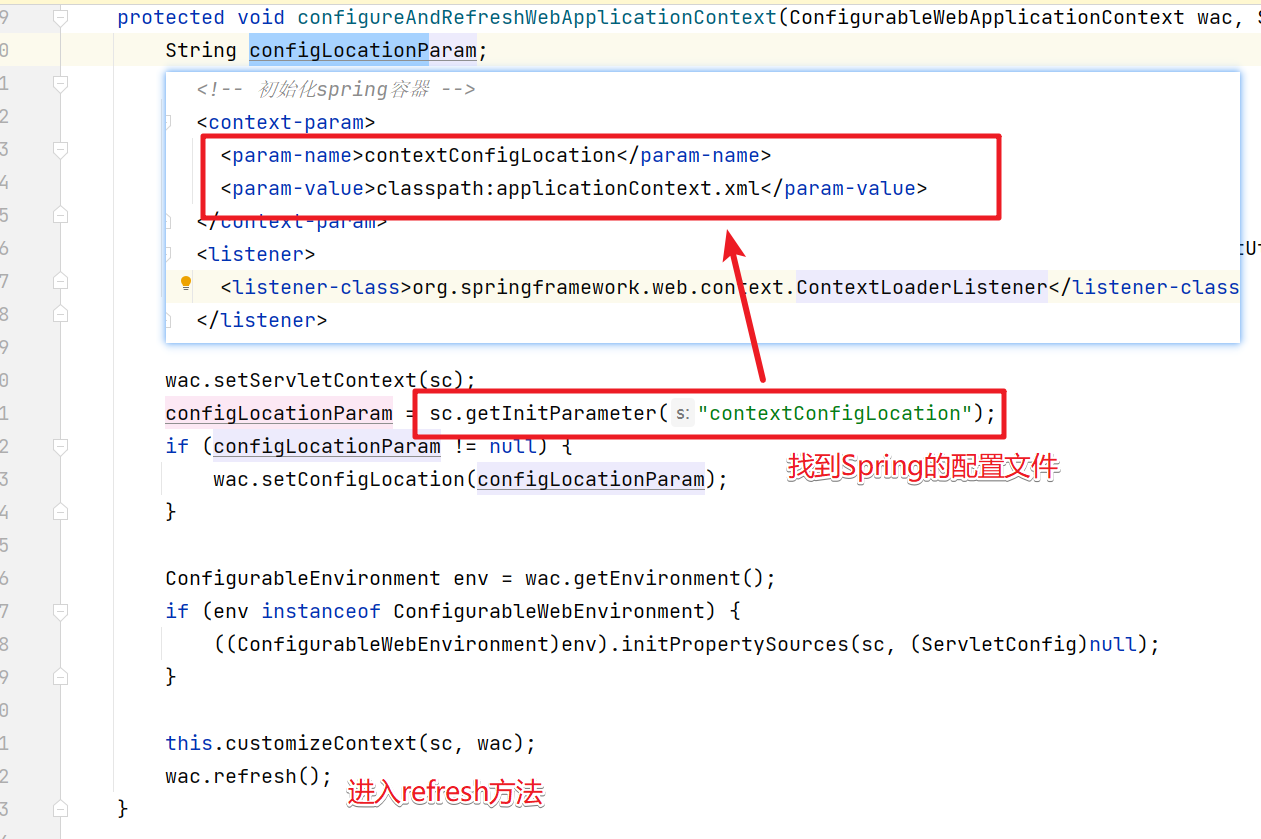
然后进入configureAndRefreshWebApplicationContext方法中。
refresh()方法
	@Override
	public void refresh() throws BeansException, IllegalStateException {
		synchronized (this.startupShutdownMonitor) {
			// Prepare this context for refreshing.
			/**
			 *
			 * 1、设置容器的启动时间
			 * 2、设置活跃状态为true
			 * 3、设置关闭状态为false
			 * 4、获取Environment对象,并加载当前系统的属性值到Environment对象中
			 * 5、准备监听器和事件的集合对象,默认为空的集合
			 */

			prepareRefresh();

			// Tell the subclass to refresh the internal bean factory.
			// 创建容器对象:DefaultListableBeanFactory
			// 加载xml配置文件的属性值到当前工厂中,最重要的就是BeanDefinition
			ConfigurableListableBeanFactory beanFactory = obtainFreshBeanFactory();

			// Prepare the bean factory for use in this context.
			// beanFactory的准备工作,对各种属性进行填充
			prepareBeanFactory(beanFactory);

			try {
				// Allows post-processing of the bean factory in context subclasses.
				// 子类覆盖方法做额外的处理,此处我们自己一般不做任何扩展工作,但是可以查看web中的代码,是有具体实现的
				postProcessBeanFactory(beanFactory);

				// Invoke factory processors registered as beans in the context.
				// 调用各种beanFactory处理器
				invokeBeanFactoryPostProcessors(beanFactory);

				// Register bean processors that intercept bean creation.
				// 注册bean处理器,这里只是注册功能,真正调用的是getBean方法
				registerBeanPostProcessors(beanFactory);

				// Initialize message source for this context.
				// 为上下文初始化message源,即不同语言的消息体,国际化处理,在springmvc的时候通过国际化的代码重点讲
				initMessageSource();

				// Initialize event multicaster for this context.
				// 初始化事件监听多路广播器
				initApplicationEventMulticaster();

				// Initialize other special beans in specific context subclasses.
				// 留给子类来初始化其他的bean
				onRefresh();

				// Check for listener beans and register them.
				// 在所有注册的bean中查找listener bean,注册到消息广播器中
				registerListeners();

				// Instantiate all remaining (non-lazy-init) singletons.
				// 初始化剩下的单实例(非懒加载的)
				finishBeanFactoryInitialization(beanFactory);

				// Last step: publish corresponding event.
				// 完成刷新过程,通知生命周期处理器lifecycleProcessor刷新过程,同时发出ContextRefreshEvent通知别人
				finishRefresh();
			}

			catch (BeansException ex) {
				if (logger.isWarnEnabled()) {
					logger.warn("Exception encountered during context initialization - " +
							"cancelling refresh attempt: " + ex);
				}

				// Destroy already created singletons to avoid dangling resources.
				// 为防止bean资源占用,在异常处理中,销毁已经在前面过程中生成的单件bean
				destroyBeans();

				// Reset 'active' flag.
				// 重置active标志
				cancelRefresh(ex);

				// Propagate exception to caller.
				throw ex;
			}

			finally {
				// Reset common introspection caches in Spring's core, since we
				// might not ever need metadata for singleton beans anymore...
				resetCommonCaches();
			}
		}
	}
配置文件的加载解析需要进入obtainFreshBeanFactory()方法中加载配置文件。
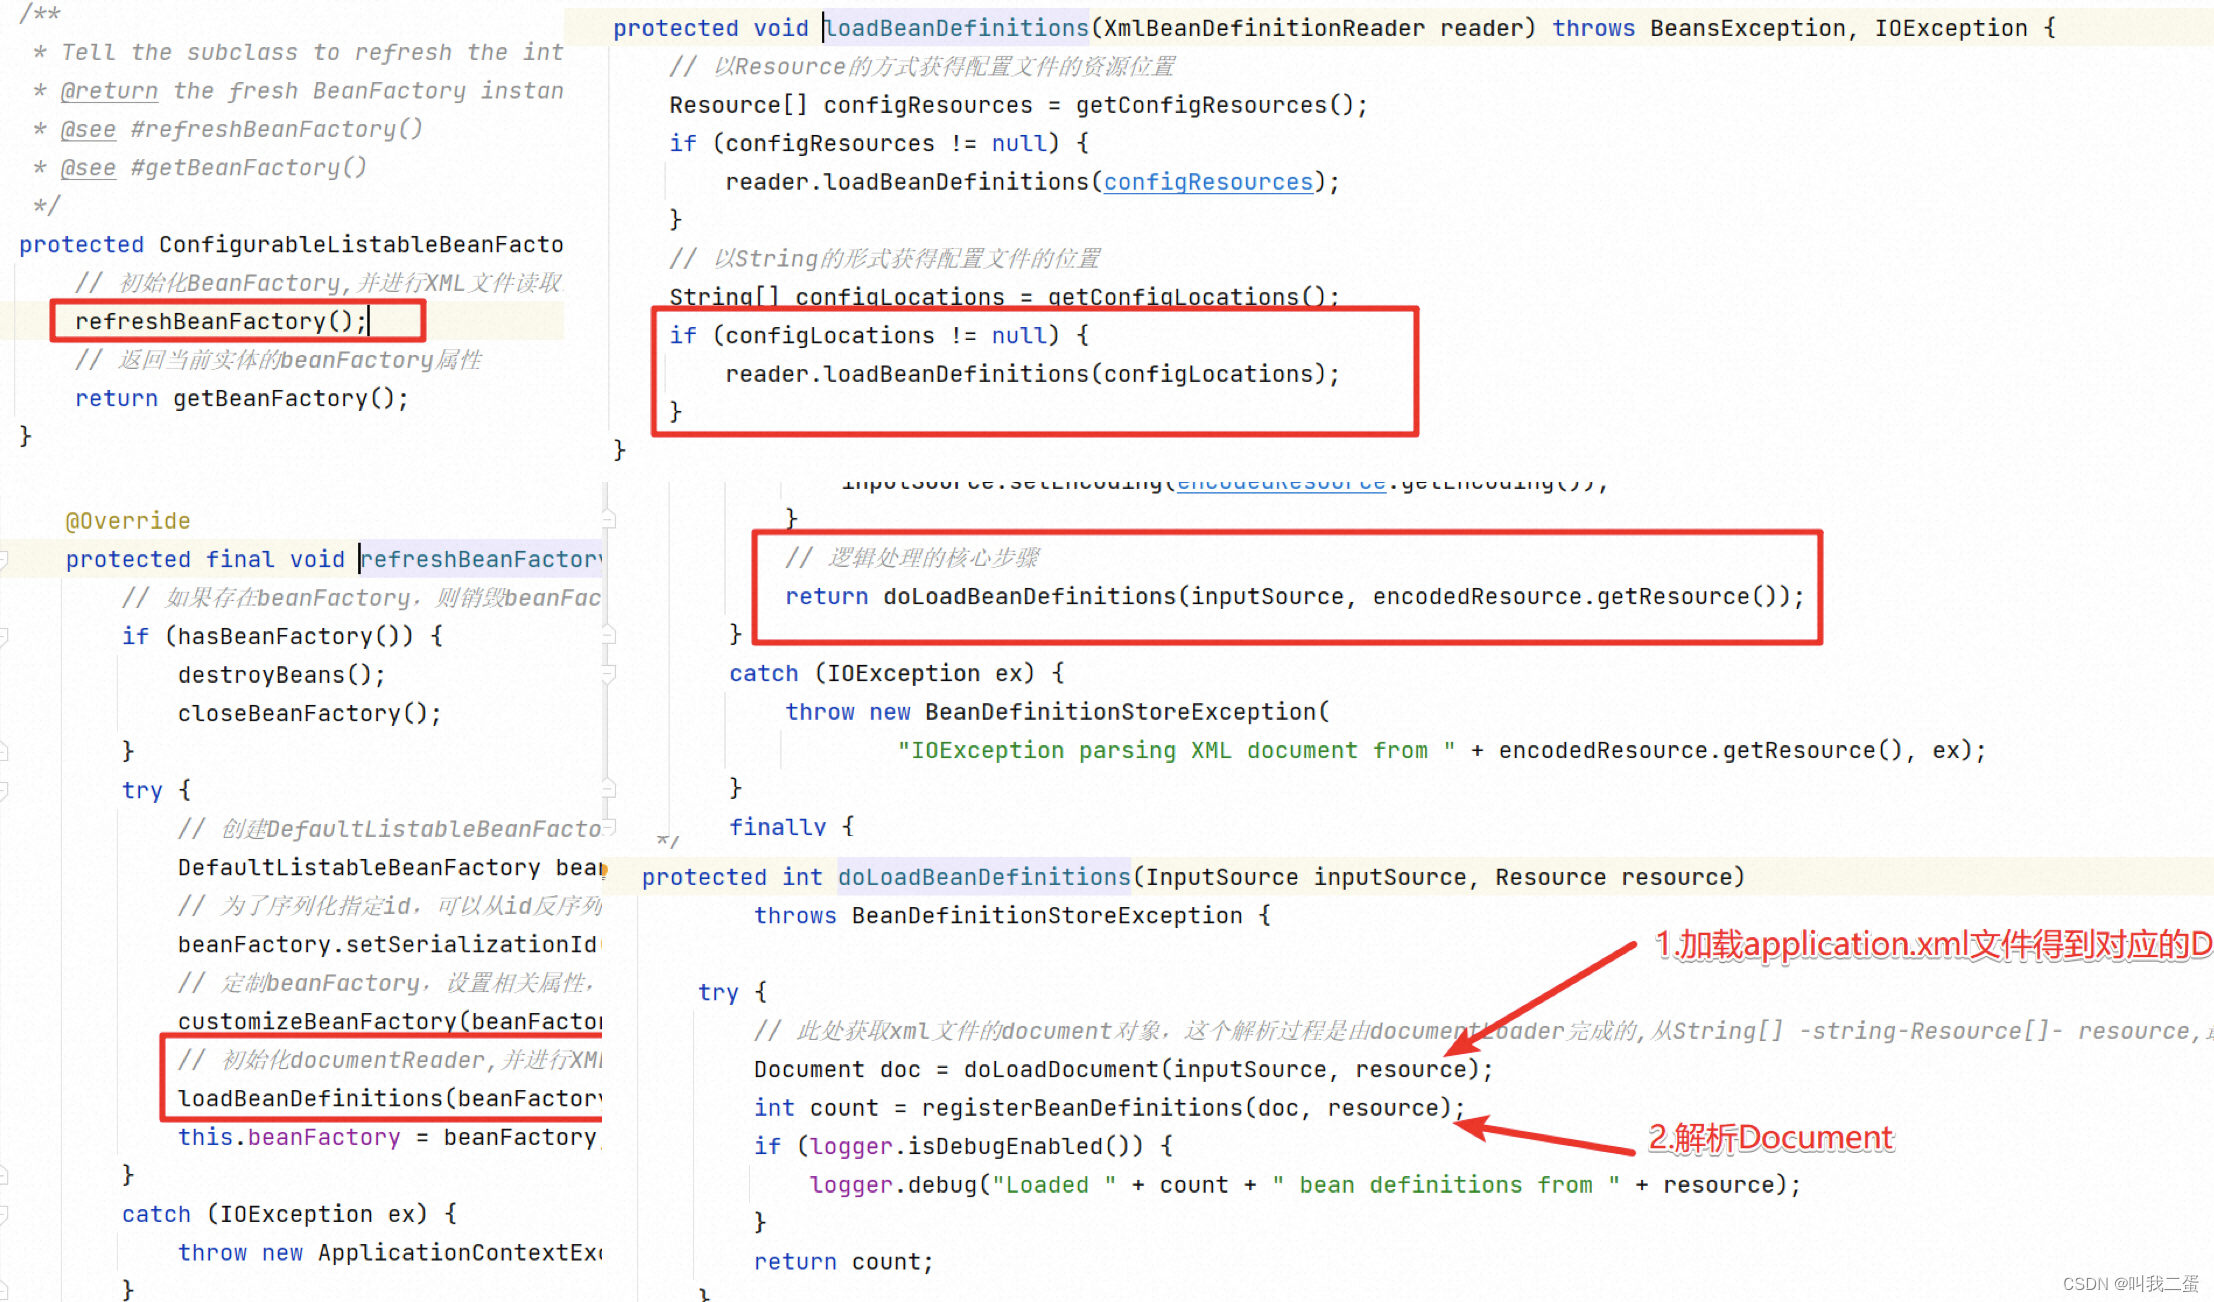
解析配置
最终会进入registerBeanDefinitions方法解析配置文件
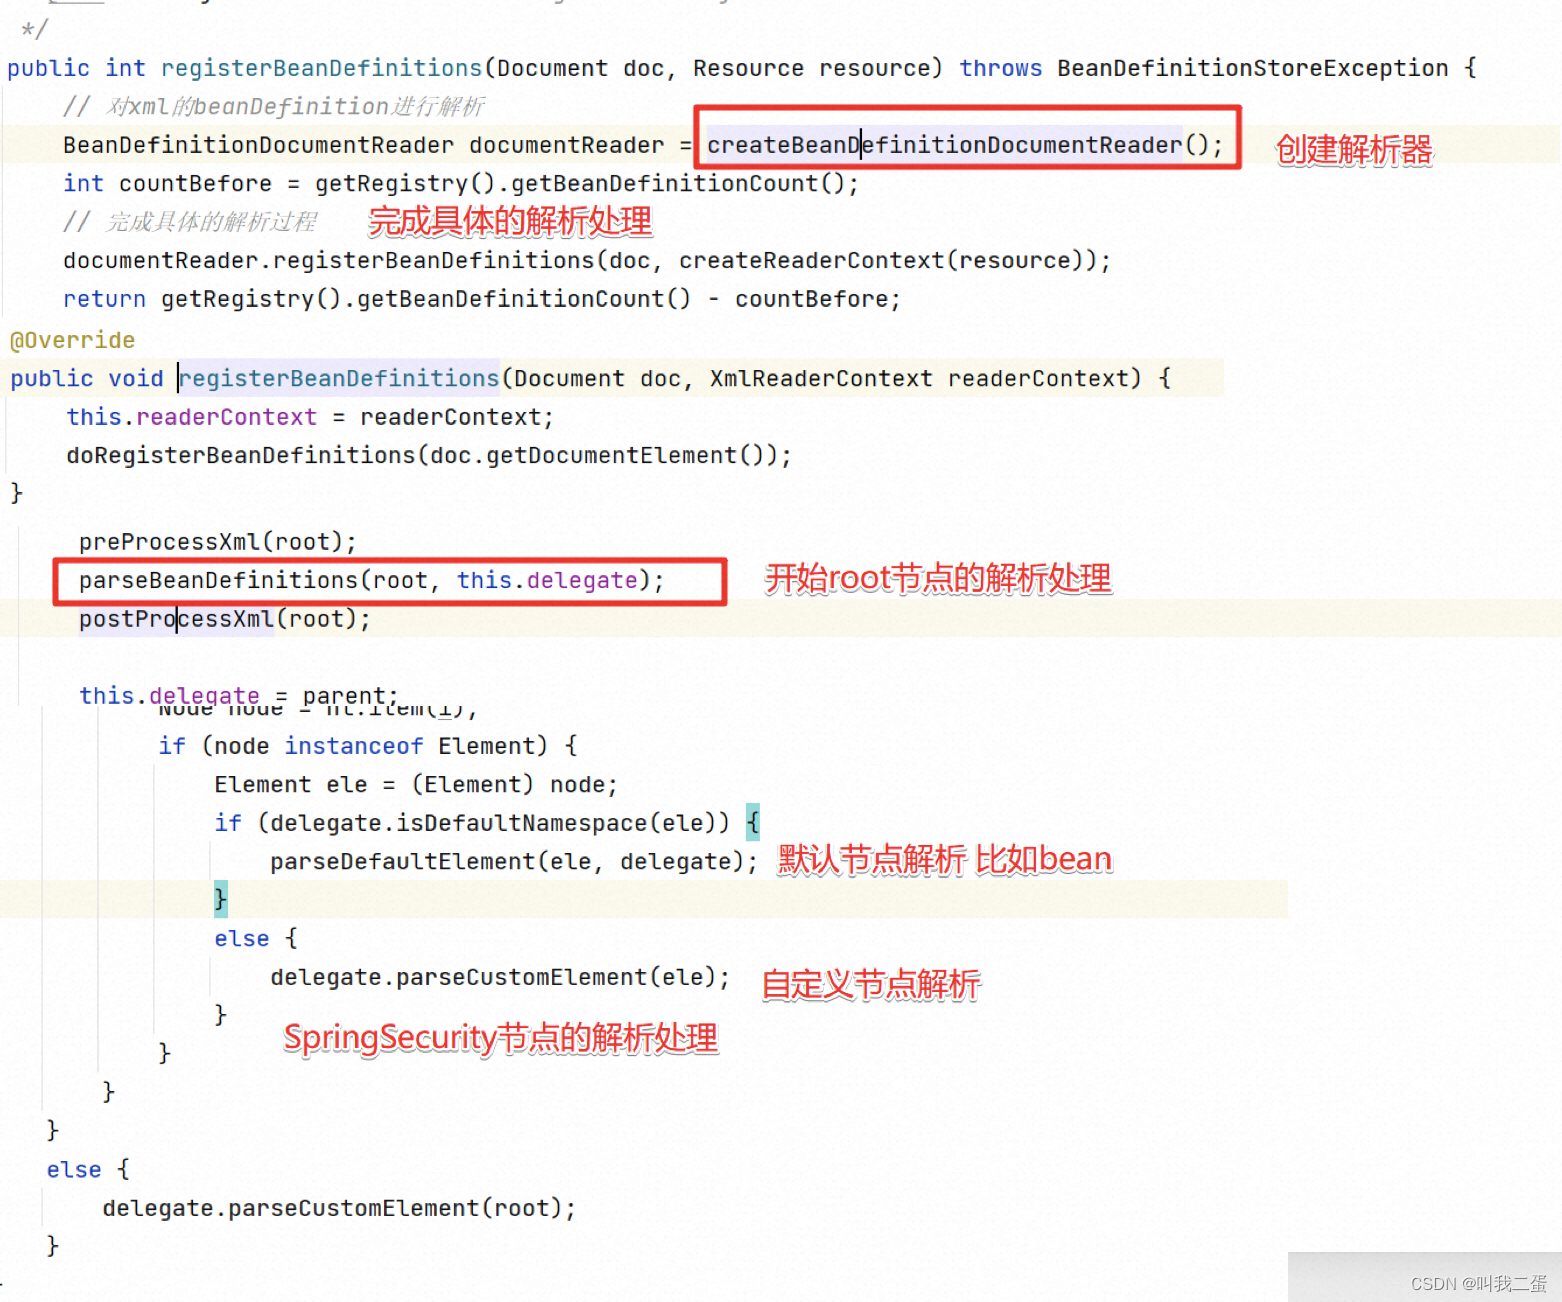
parseDefaultElement方法会完成Spring中提供的默认方法解析,具体如下:
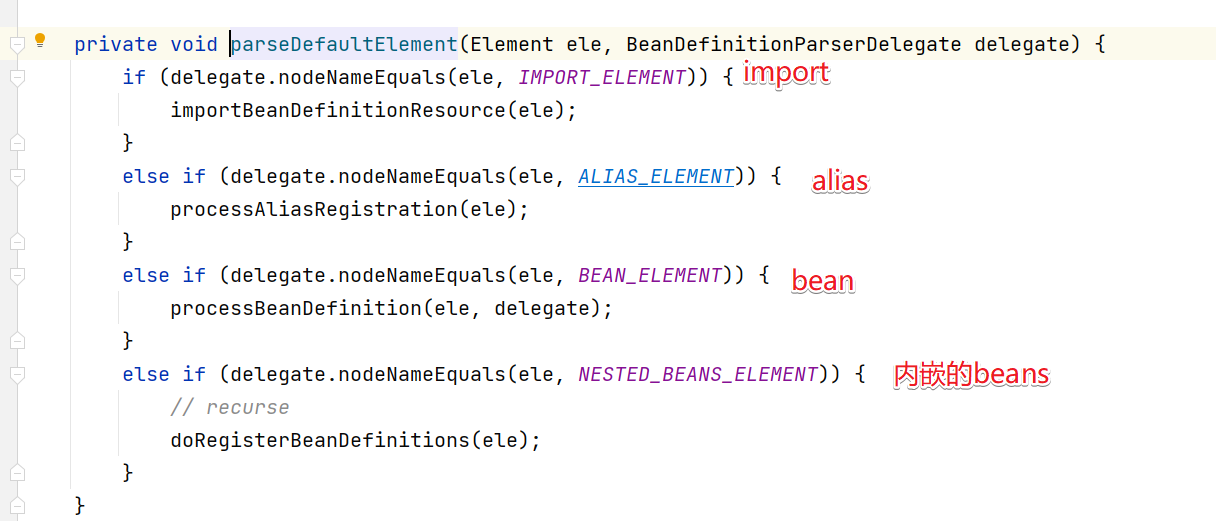
而SpringSecurity的解析是先进入import中,然后进入到parseCustomElement()方法来解析。
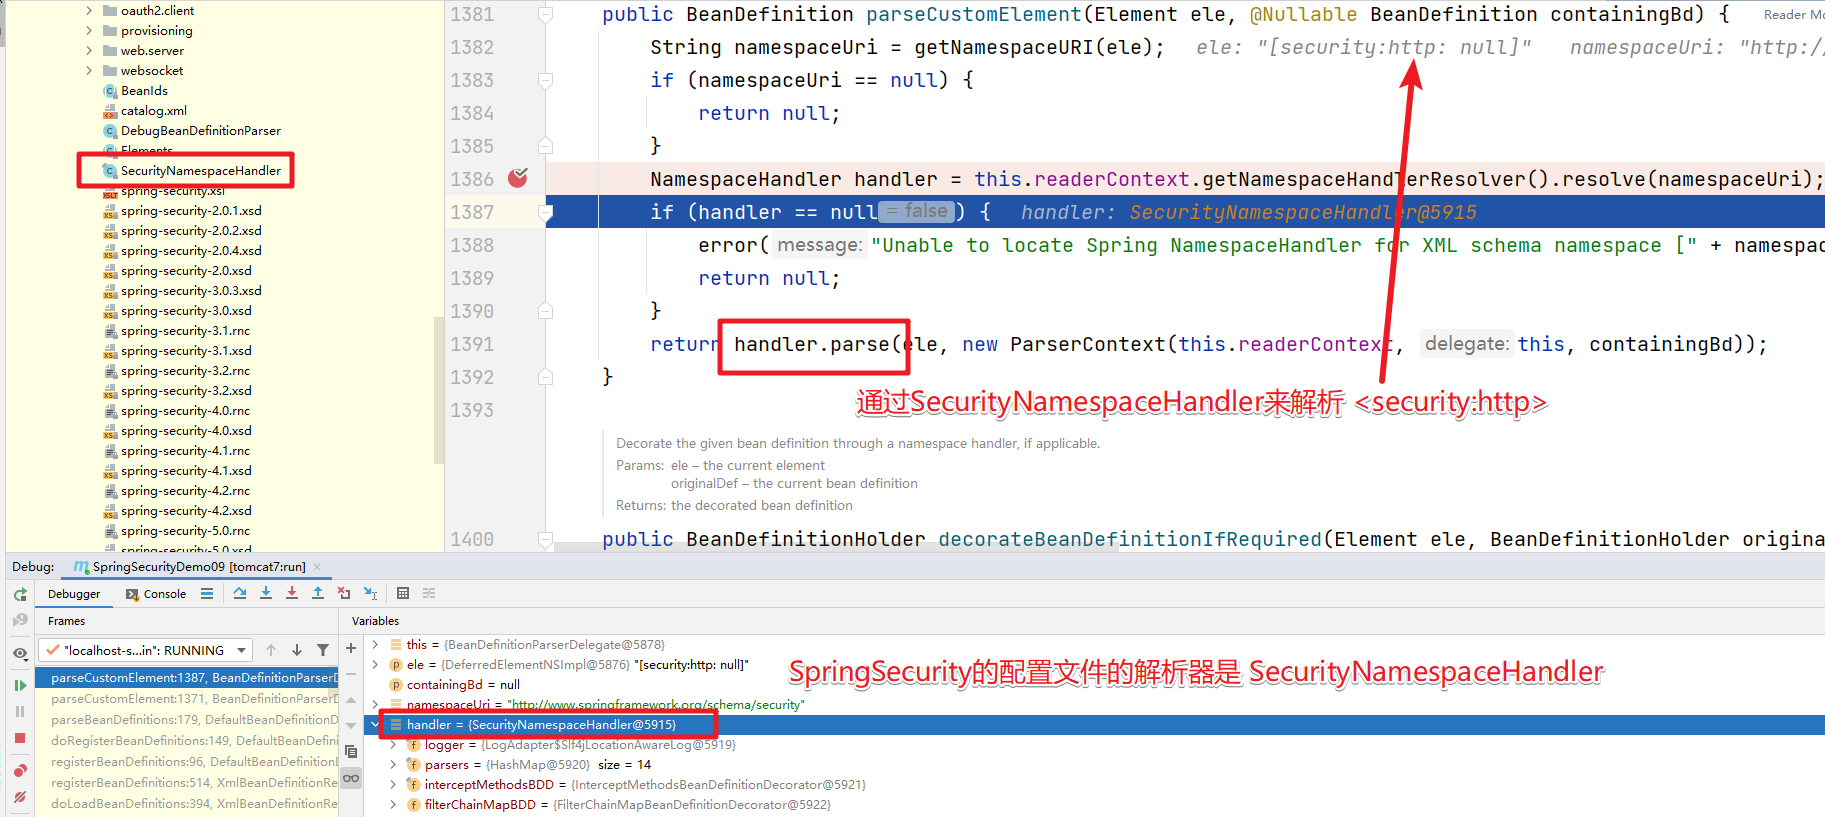
SpringSecurity 解析器
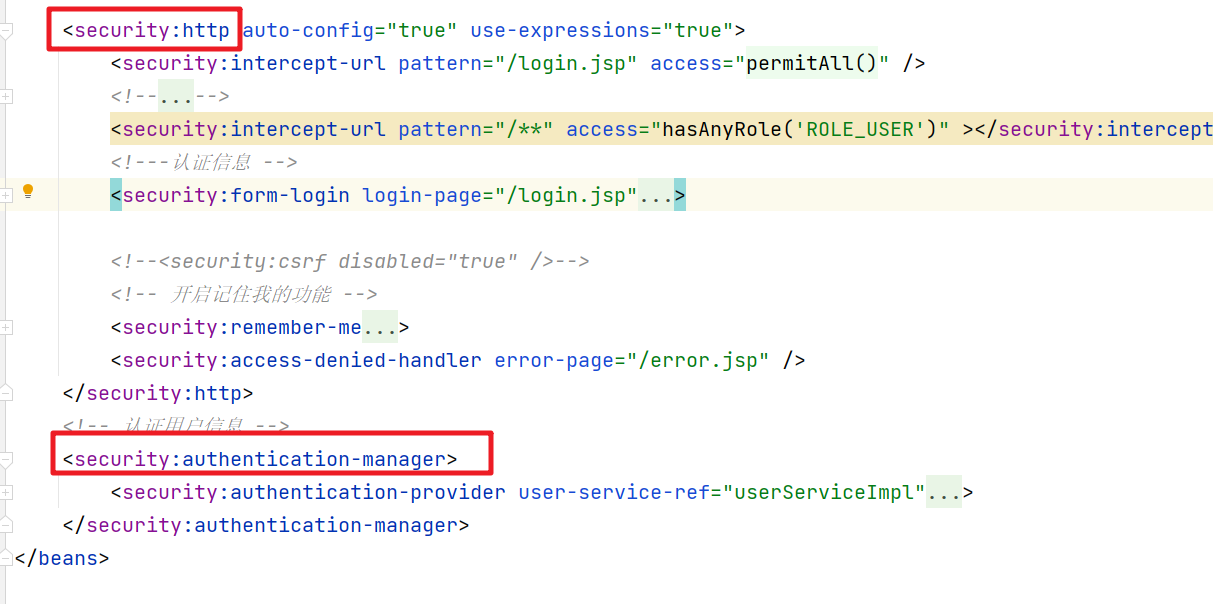
在SpringSecurity的配置文件中使用了几个标签。
每个标签都有对应的解析器。

在SecurityNamespaceHandler中的 parsers中保存的就是节点对应的解析器。

security:http 解析
解析器会先解析security:http标签了,下面的逻辑也很清晰:
- 先判断是否合法
- 然后获取标签名称
- 根据标签名称获取对应的解析器
- 然后通过解析器来解析标签
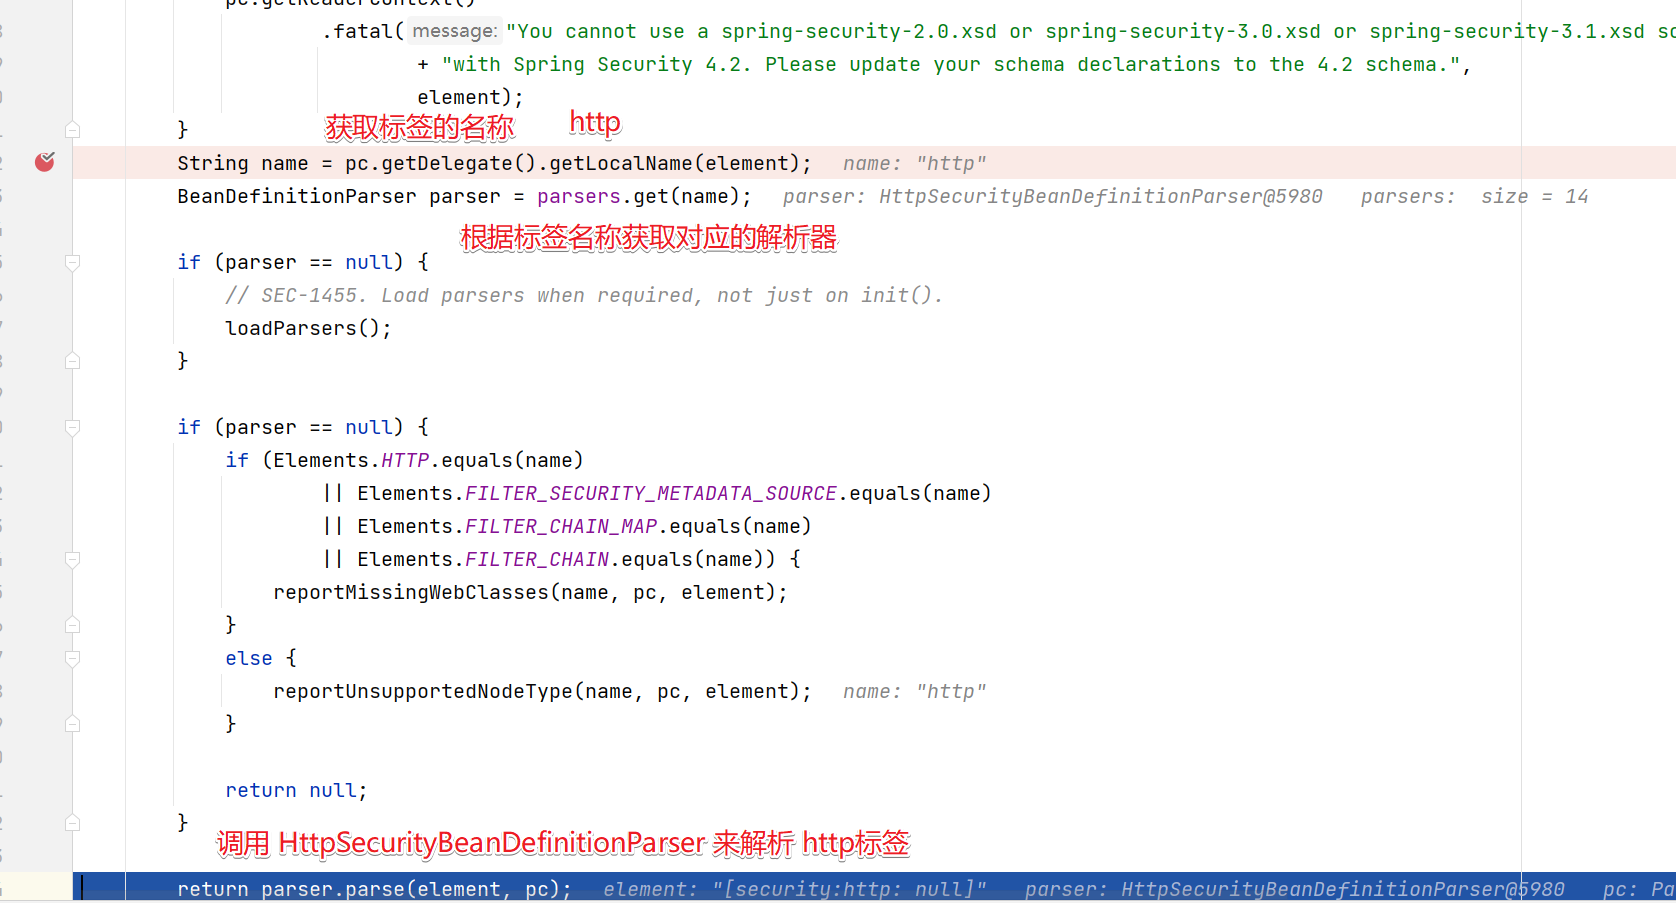
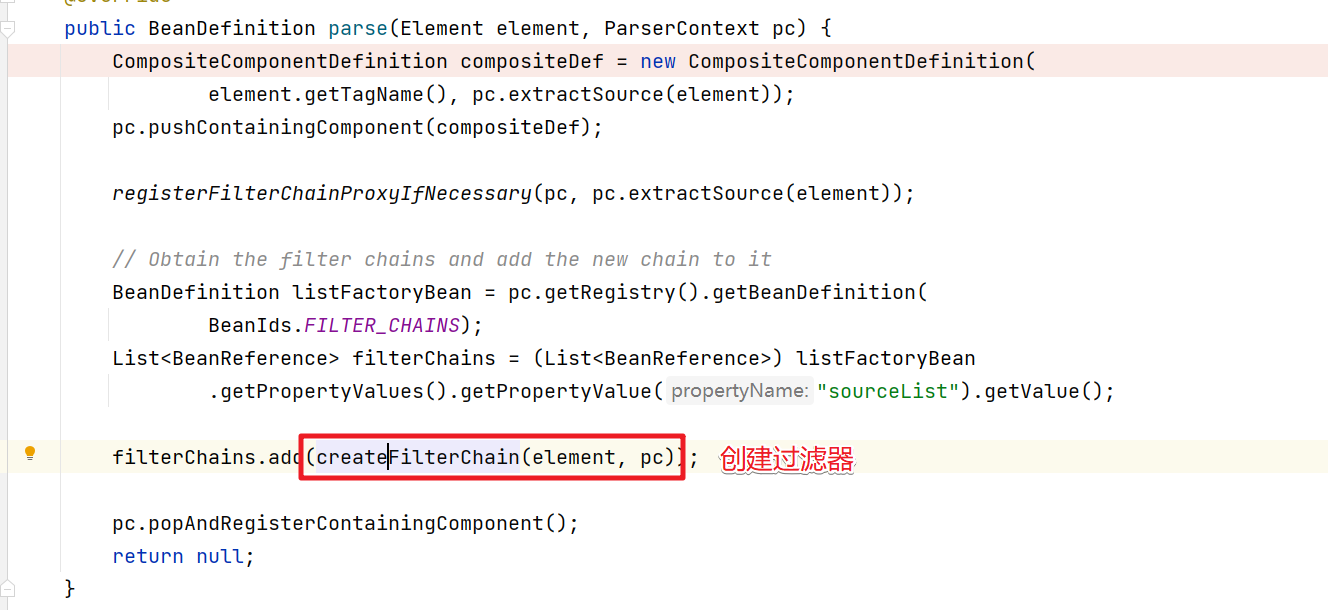
进入HttpSecurityBeanDefinitionParser中看看解析http标签做了什么事情。
	@Override
	public BeanDefinition parse(Element element, ParserContext pc) {
        // CompositeComponentDefinition  保存内嵌的BeanDefinition
		CompositeComponentDefinition compositeDef = new CompositeComponentDefinition(
				element.getTagName(), pc.extractSource(element));
	    // compositeDef定义保存在了 父容器中
		pc.pushContainingComponent(compositeDef);
		// 完成FilterChainProxy的注册
		registerFilterChainProxyIfNecessary(pc, pc.extractSource(element));

		// Obtain the filter chains and add the new chain to it
		BeanDefinition listFactoryBean = pc.getRegistry().getBeanDefinition(
				BeanIds.FILTER_CHAINS);
		List<BeanReference> filterChains = (List<BeanReference>) listFactoryBean
				.getPropertyValues().getPropertyValue("sourceList").getValue();
		// createFilterChain(element, pc) 创建对应的过滤器并添加到了filterChains这个过滤器链中
		filterChains.add(createFilterChain(element, pc));

		pc.popAndRegisterContainingComponent();
		return null;
	}
上面代码的几个关键点:
- CompositeComponentDefinition保存配置文件中的嵌套的BeanDefinition信息
- 完成了FilterChainProxy的注册
- 完成了处理请求的过滤器和过滤器链的处理
FilterChainProxy的注册过程
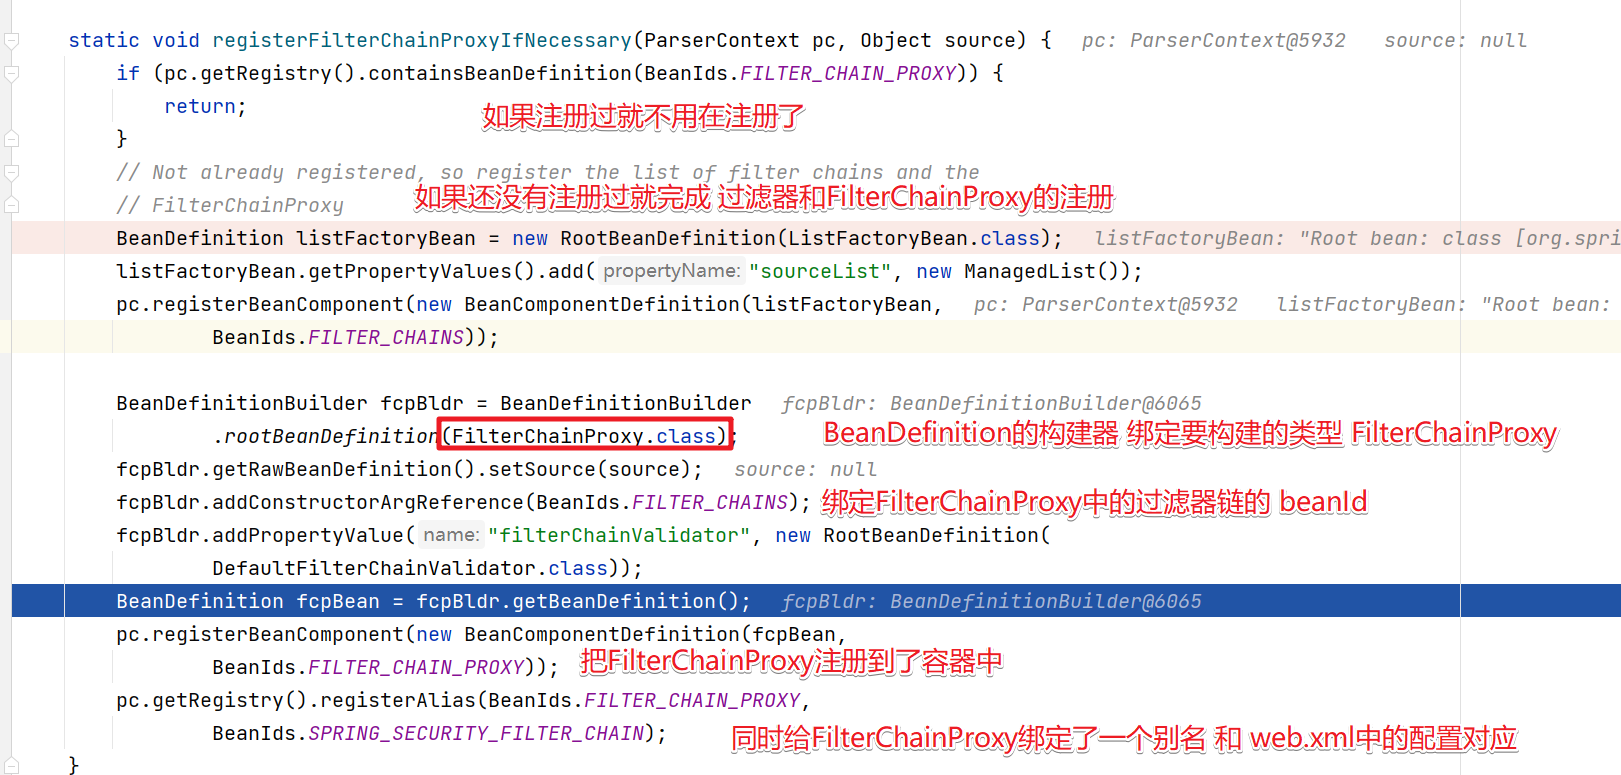
SpringSecurity在BeanId中定义了相关的固定beanId值。
public abstract class BeanIds {
	private static final String PREFIX = "org.springframework.security.";

	/**
	 * The "global" AuthenticationManager instance, registered by the
	 * <authentication-manager> element
	 */
	public static final String AUTHENTICATION_MANAGER = PREFIX + "authenticationManager";

	/** External alias for FilterChainProxy bean, for use in web.xml files */
	public static final String SPRING_SECURITY_FILTER_CHAIN = "springSecurityFilterChain";

	public static final String CONTEXT_SOURCE_SETTING_POST_PROCESSOR = PREFIX
			+ "contextSettingPostProcessor";

	public static final String USER_DETAILS_SERVICE = PREFIX + "userDetailsService";
	public static final String USER_DETAILS_SERVICE_FACTORY = PREFIX
			+ "userDetailsServiceFactory";

	public static final String METHOD_ACCESS_MANAGER = PREFIX
			+ "defaultMethodAccessManager";

	public static final String FILTER_CHAIN_PROXY = PREFIX + "filterChainProxy";
	public static final String FILTER_CHAINS = PREFIX + "filterChains";

	public static final String METHOD_SECURITY_METADATA_SOURCE_ADVISOR = PREFIX
			+ "methodSecurityMetadataSourceAdvisor";
	public static final String EMBEDDED_APACHE_DS = PREFIX
			+ "apacheDirectoryServerContainer";
	public static final String CONTEXT_SOURCE = PREFIX + "securityContextSource";

	public static final String DEBUG_FILTER = PREFIX + "debugFilter";
}
创建 SpringSecurity 过滤器
接下来看看SpringSecurity中默认的过滤器是如何创建
private BeanReference createFilterChain(Element element, ParserContext pc) {
    // 判断是否需要Security拦截
    boolean secured = !OPT_SECURITY_NONE.equals(element.getAttribute(ATT_SECURED));

    if (!secured) {
        // 如果没配置pattern属性并且配置了request-matcher-ref为空 添加错误信息
        if (!StringUtils.hasText(element.getAttribute(ATT_PATH_PATTERN)) && !StringUtils.hasText(ATT_REQUEST_MATCHER_REF)) {
            pc.getReaderContext().error("The '" + ATT_SECURED + "' attribute must be used in combination with" + " the '" + ATT_PATH_PATTERN + "' or '" + ATT_REQUEST_MATCHER_REF + "' attributes.", pc.extractSource(element));
        }

        for (int n = 0; n < element.getChildNodes().getLength(); n++) {
            // 如果有子节点则添加错误信息
            if (element.getChildNodes().item(n) instanceof Element) {
                pc.getReaderContext().error("If you are using <http> to define an unsecured pattern, " + "it cannot contain child elements.", pc.extractSource(element));
            }
        }

        // 创建过滤器链
        return createSecurityFilterChainBean(element, pc, Collections.emptyList());
    }

    // portMapper、portResolver主要提供给SSL相关类使用
    final BeanReference portMapper = createPortMapper(element, pc);
    final BeanReference portResolver = createPortResolver(portMapper, pc);

    // 新建一个空的authenticationProviders集合
    ManagedList<BeanReference> authenticationProviders = new ManagedList<BeanReference>();
    // 通过空的authenticationProviders集合产生一个AuthenticationManager的bean定义
    BeanReference authenticationManager = createAuthenticationManager(element, pc, authenticationProviders);

    // 是否全采用默认配置
    boolean forceAutoConfig = isDefaultHttpConfig(element);
    // 看下面
    HttpConfigurationBuilder httpBldr = new HttpConfigurationBuilder(element, forceAutoConfig, pc, portMapper, portResolver, authenticationManager);
    // 看下面
    AuthenticationConfigBuilder authBldr = new AuthenticationConfigBuilder(element, forceAutoConfig, pc, httpBldr.getSessionCreationPolicy(), httpBldr.getRequestCache(), authenticationManager, httpBldr.getSessionStrategy(), portMapper, portResolver, httpBldr.getCsrfLogoutHandler());

    // 配置logoutHandlers
    httpBldr.setLogoutHandlers(authBldr.getLogoutHandlers());
    httpBldr.setEntryPoint(authBldr.getEntryPointBean());
    httpBldr.setAccessDeniedHandler(authBldr.getAccessDeniedHandlerBean());

    // 向AuthenticationProviders中添加provider
    authenticationProviders.addAll(authBldr.getProviders());

    List<OrderDecorator> unorderedFilterChain = new ArrayList<OrderDecorator>();

    // 向FilterChain链中添加filters
    unorderedFilterChain.addAll(httpBldr.getFilters());
    unorderedFilterChain.addAll(authBldr.getFilters());

    // 添加自定义的Filter,也就是custom-filter标签定义的Filter
    unorderedFilterChain.addAll(buildCustomFilterList(element, pc));

    // 对过滤器进行排序
    Collections.sort(unorderedFilterChain, new OrderComparator());
    // 校验过滤器是否有效
    checkFilterChainOrder(unorderedFilterChain, pc, pc.extractSource(element));

    // The list of filter beans
    List<BeanMetadataElement> filterChain = new ManagedList<BeanMetadataElement>();

    for (OrderDecorator od : unorderedFilterChain) {
        filterChain.add(od.bean);
    }

    // 创建SecurityFilterChain
    return createSecurityFilterChainBean(element, pc, filterChain);
}
先看HttpConfigurationBuilder的构造方法
public HttpConfigurationBuilder(Element element, boolean addAllAuth, ParserContext pc, BeanReference portMapper, BeanReference portResolver, BeanReference authenticationManager) {
    this.httpElt = element;
    this.addAllAuth = addAllAuth;
    this.pc = pc;
    this.portMapper = portMapper;
    this.portResolver = portResolver;
    this.matcherType = MatcherType.fromElement(element);
    // 获取子标签intercept-url
    interceptUrls = DomUtils.getChildElementsByTagName(element, Elements.INTERCEPT_URL);

    for (Element urlElt : interceptUrls) {
        // 判断子标签intercept-url是否配置了filters属性
        // 如果配置了filters属性添加错误消息,因为Security已经不再支持filters属性了
        if (StringUtils.hasText(urlElt.getAttribute(ATT_FILTERS))) {
            pc.getReaderContext().error("The use of \"filters='none'\" is no longer supported. Please define a" + " separate <http> element for the pattern you want to exclude and use the attribute" + " \"security='none'\".", pc.extractSource(urlElt));
        }
    }

    // 获取标签create-session属性
    String createSession = element.getAttribute(ATT_CREATE_SESSION);

    if (StringUtils.hasText(createSession)) {
        sessionPolicy = createPolicy(createSession);
    } else {
        // 默认策略
        sessionPolicy = SessionCreationPolicy.IF_REQUIRED;
    }

    // 创建一系列过滤器
    createCsrfFilter();
    createSecurityContextPersistenceFilter();
    createSessionManagementFilters();
    createWebAsyncManagerFilter();
    createRequestCacheFilter();
    createServletApiFilter(authenticationManager);
    createJaasApiFilter();
    createChannelProcessingFilter();
    createFilterSecurityInterceptor(authenticationManager);
    createAddHeadersFilter();
}
然后进入AuthenticationConfigBuilder中来查看,发向其实也创建了很多的过滤器
public AuthenticationConfigBuilder(Element element, boolean forceAutoConfig, ParserContext pc, SessionCreationPolicy sessionPolicy, BeanReference requestCache, BeanReference authenticationManager, BeanReference sessionStrategy, BeanReference portMapper, BeanReference portResolver, BeanMetadataElement csrfLogoutHandler) {
    this.httpElt = element;
    this.pc = pc;
    this.requestCache = requestCache;
    // 是否自动配置
    autoConfig = forceAutoConfig | "true".equals(element.getAttribute(ATT_AUTO_CONFIG));
    // 是否允许session
    this.allowSessionCreation = sessionPolicy != SessionCreationPolicy.NEVER && sessionPolicy != SessionCreationPolicy.STATELESS;
    this.portMapper = portMapper;
    this.portResolver = portResolver;
    this.csrfLogoutHandler = csrfLogoutHandler;

    // 创建一系列过滤器
    createAnonymousFilter();
    createRememberMeFilter(authenticationManager);
    createBasicFilter(authenticationManager);
    createFormLoginFilter(sessionStrategy, authenticationManager);
    createOpenIDLoginFilter(sessionStrategy, authenticationManager);
    createX509Filter(authenticationManager);
    createJeeFilter(authenticationManager);
    createLogoutFilter();
    createLoginPageFilterIfNeeded();
    createUserDetailsServiceFactory();
    createExceptionTranslationFilter();
}
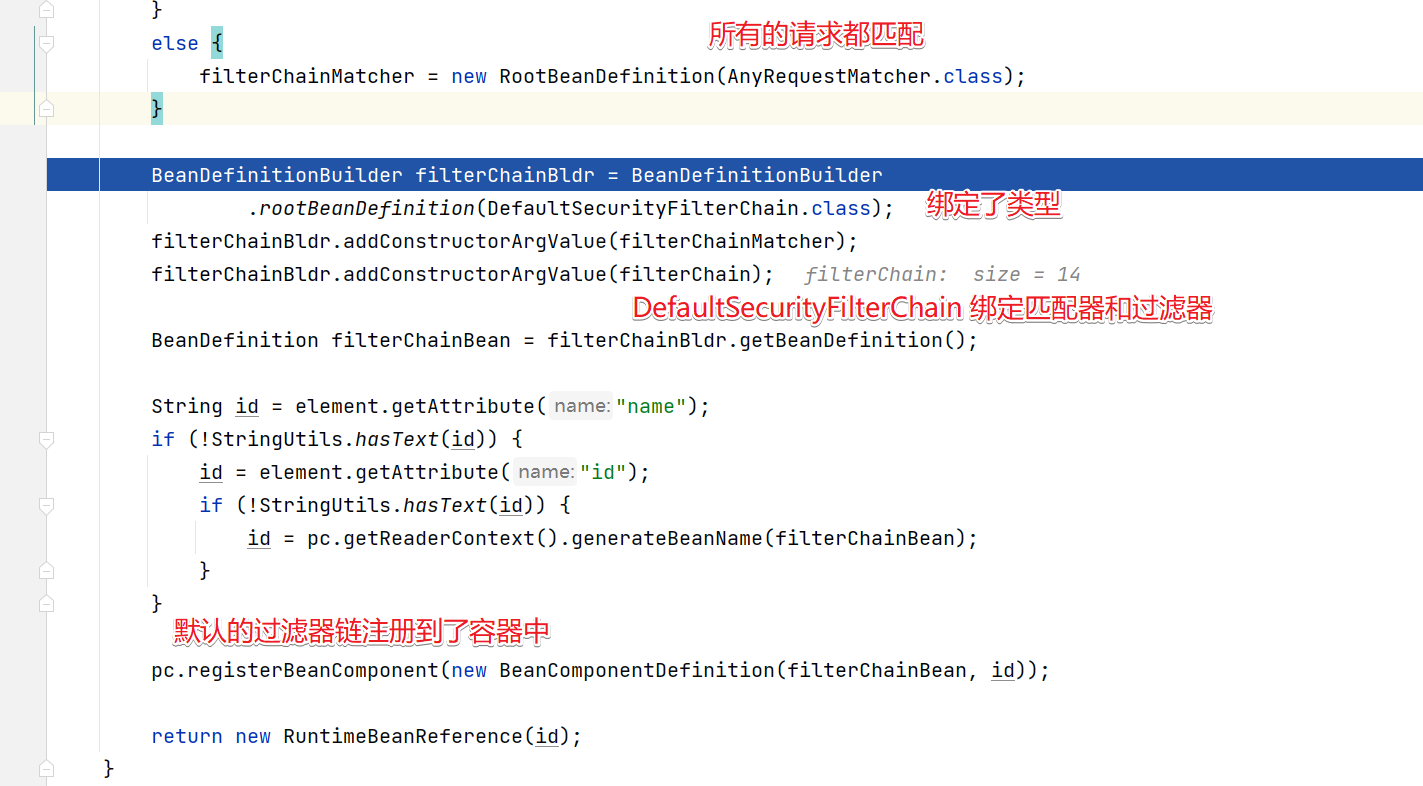
创建SecurityFilterChain
总结
通过以上的分析可以知道,在Spring初始化的时候根据SpringSecurity的相关配置按照其解析器将相关的过滤器加载到了Spring Bean中,在此后的请求中就可以使用到SpringSecurity相关的过滤器。


