🎄欢迎来到@边境矢梦°的csdn博文🎄
🎄本文主要梳理手动实现Spring底层机制🎄
🌈我是边境矢梦°,一个正在为秋招和算法竞赛做准备的学生🌈
🎆喜欢的朋友可以关注一下🫰🫰🫰,下次更新不迷路🎆
Ps: 月亮越亮说明知识点越重要 (重要性或者难度越大)🌑🌒🌓🌔🌕
目录
实现任务阶段 1- 编写自己 Spring 容器,实现扫描包, 得到 bean 的 class 对象
实现任务阶段 2- 扫描将 bean 信息封装到 BeanDefinition 对象, 并放入到 Map
实现任务阶段 3- 初始化 bean 单例池,并完成 getBean 方法 , createBean 方法
我把下面的代码放到了GitHub托管平台上了, 如果有需要的童鞋可以去取https://github.com/luoxiongbo/code.git

实现任务阶段 1- 编写自己 Spring 容器,实现扫描包, 得到 bean 的 class 对象
1. 先用maven将项目框架搭起来, 大致的包结构

2. 在annotation包下创建ComponentScan 和 Component 注解
import com.lxbStu.spring.annotation.ComponentScan;

@ComponentScan(value = "com.lxbStu.spring.component")
public class LxbSpringConfig {

}
@Retention(RetentionPolicy.RUNTIME)
@Target(ElementType.TYPE)
public @interface Component {
String value() default "";
}3. 在ioc包下创建要给配置配LxbSpringConfig, 充当.xml的作用
@ComponentScan(value = "com.lxbStu.spring.component")
public class LxbSpringConfig {

}
4. 在component包下创建bean
@Component("monsterService")
public class MonsterService {
}
@Component("monsterDao")
public class MonsterDao {
}5. 在ioc包下创建我们自己写的ClassPathXmlApplicationContext
public class LxbSpringApplicationContext {
    private Class config;
    private final ConcurrentHashMap<String, Object> singleton = new ConcurrentHashMap<>();

    public ConcurrentHashMap<String, Object> getIoc() {
        return singleton;
    }

    public Object getBean(String bean) {
        return singleton.get(bean);
    }
    public LxbSpringApplicationContext(Class ClassConfig) {
        this.config = ClassConfig;
        ComponentScan component = (ComponentScan) config.getDeclaredAnnotation(ComponentScan.class);
        String path = component.value();
        path = path.replace(".", "/");
        System.out.println("扫描的路径是 : " + path);
        System.out.println("=====================================================");
        ClassLoader classLoader = LxbSpringApplicationContext.class.getClassLoader();
        URL resource = classLoader.getResource(path);
        //System.out.println(resource);
        File ComponentFile = new File(resource.getFile());
        if(ComponentFile.isDirectory()) {
            File[] files = ComponentFile.listFiles();
            for (File file : files) {
                String classPath = file.getAbsolutePath();
                System.out.println("类的绝对路径是 : " + classPath);

                if(classPath.endsWith(".class")) {
                    String className = classPath.substring(classPath.lastIndexOf("\\") + 1, classPath.indexOf(".class"));
                    String classFullPath = path.replace("/", ".") + "." + className;
                    System.out.println("类的全路径是 :" + classFullPath + ", 类名是 :" + className);

                    try {
                        Class<?> clazz = Class.forName(classFullPath);

                        if(clazz.isAnnotationPresent(Component.class)) {
                            Component beanId = clazz.getDeclaredAnnotation(Component.class);
                            String value = beanId.value();
                            if(value == null || "".equals(value)) {
                                value = className.substring(0, 1).toLowerCase() + className.substring(1);
                            }
                            //System.out.println(value);
                            System.out.println("是一个 bean = " + clazz);

                            try {
                                Object instance = clazz.newInstance();
                                singleton.put(value, instance);
                            } catch (InstantiationException | IllegalAccessException e) {
                                throw new RuntimeException(e);
                            }

                        } else {
                            System.out.println("不是一个 bean = " + clazz);
                        }
                        System.out.println("=====================================================");
                    } catch (ClassNotFoundException e) {
                        throw new RuntimeException(e);
                    }
                }
            }

        }

    }
}
6. 测试
public class SpringTest {
    @Test
    public void ConfigTest() {

        LxbSpringApplicationContext ioc = new LxbSpringApplicationContext(LxbSpringConfig.class);

        //ConcurrentHashMap<String, Object> beans = ioc.getIoc();
        //Enumeration<String> keys = beans.keys();
        //while (keys.hasMoreElements()) {
        //    String id = keys.nextElement();
        //    System.out.println(beans.get(id));
        //}
    }
}
结果 :
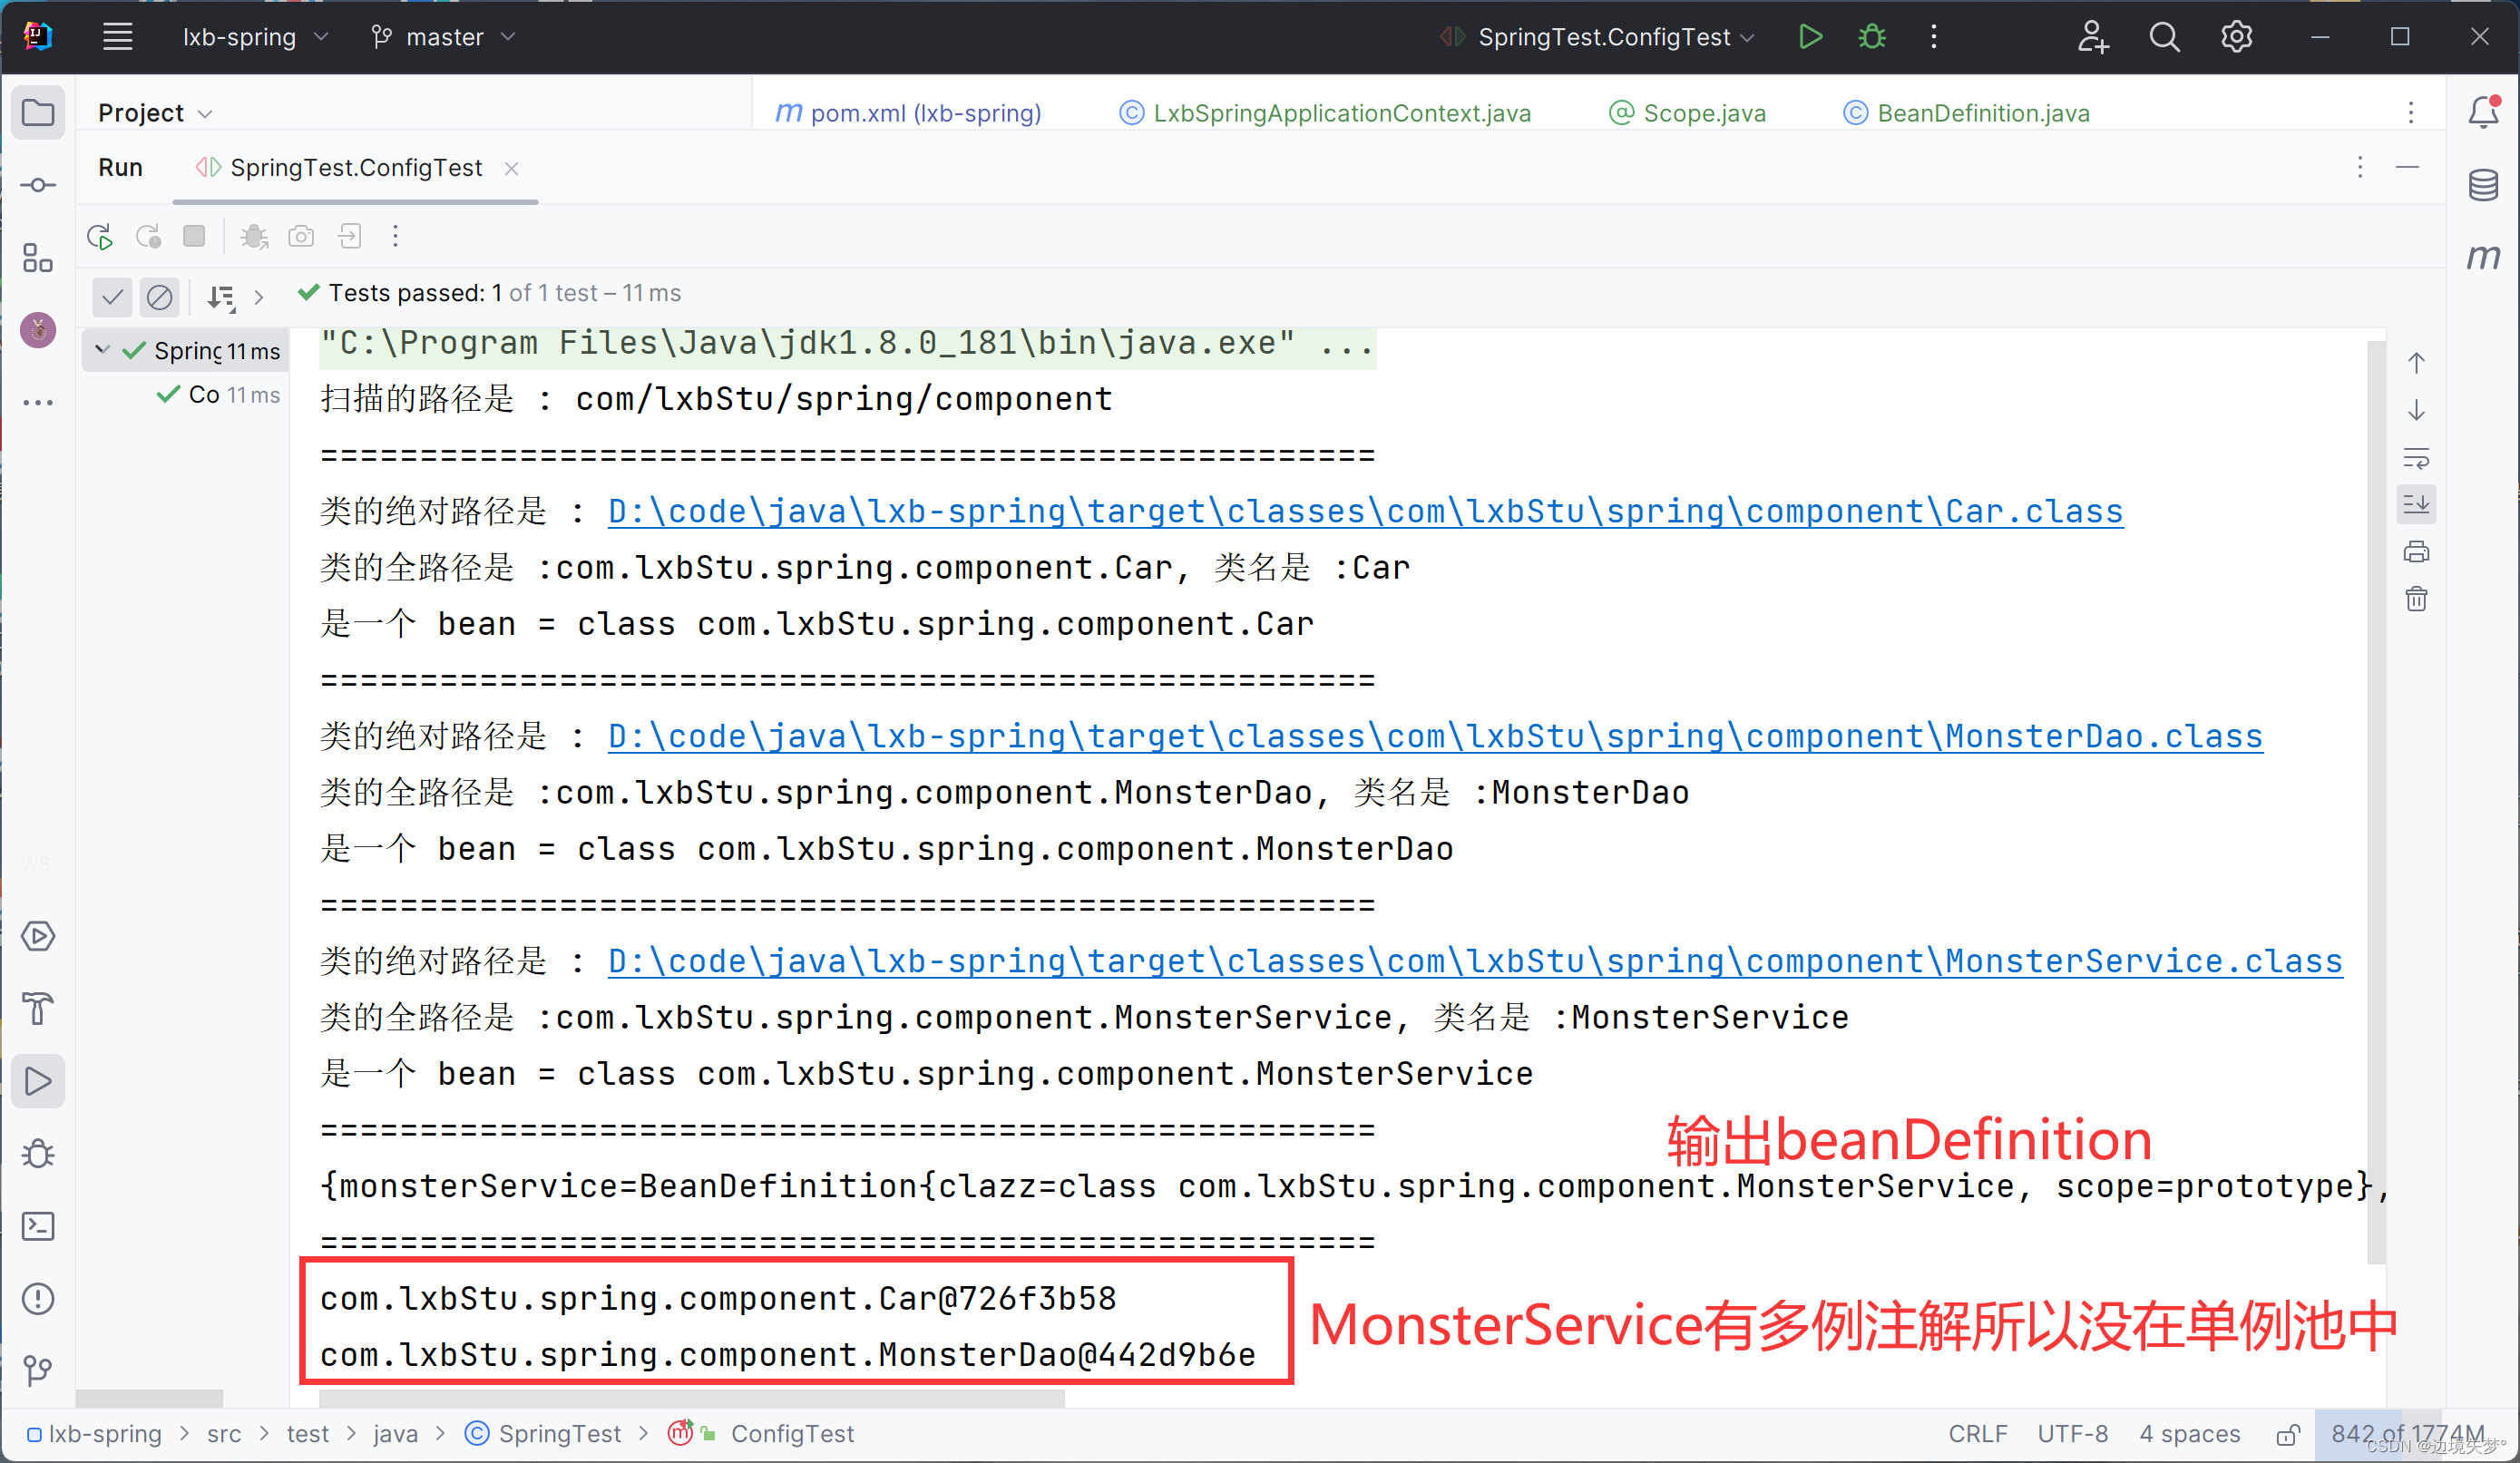
扫描的路径是 : com/lxbStu/spring/component
=====================================================
类的绝对路径是 : D:\code\java\lxb-spring\target\classes\com\lxbStu\spring\component\Car.class
类的全路径是 :com.lxbStu.spring.component.Car, 类名是 :Car
是一个 bean = class com.lxbStu.spring.component.Car
=====================================================
类的绝对路径是 : D:\code\java\lxb-spring\target\classes\com\lxbStu\spring\component\MonsterDao.class
类的全路径是 :com.lxbStu.spring.component.MonsterDao, 类名是 :MonsterDao
是一个 bean = class com.lxbStu.spring.component.MonsterDao
=====================================================
类的绝对路径是 : D:\code\java\lxb-spring\target\classes\com\lxbStu\spring\component\MonsterService.class
类的全路径是 :com.lxbStu.spring.component.MonsterService, 类名是 :MonsterService
是一个 bean = class com.lxbStu.spring.component.MonsterService
=====================================================
实现任务阶段 2- 扫描将 bean 信息封装到 BeanDefinition 对象, 并放入到 Map
1. 在annotation中创建Scope, 用来注解类是单例还是多例
@Retention(RetentionPolicy.RUNTIME)
@Target(ElementType.TYPE)
public @interface Scope {
    String value();
}
2. 修改component包中的MonsterService
@Component("monsterService")
@Scope("prototype")
public class MonsterService{}
3. 在ioc中创建BeanDefinition, 用于存放bean的元数据, bean类的数据
public class BeanDefinition {
    private Class clazz;
    private String scope;

    public void setClazz(Class clazz) {
        this.clazz = clazz;
    }

    public void setScope(String  scope) {
        this.scope = scope;
    }

    public Class getClazz() {
        return clazz;
    }

    public String  getScope() {
        return scope;
    }

    @Override
    public String toString() {
        return "BeanDefinition{" +
                "clazz=" + clazz +
                ", scope=" + scope +
                '}';
    }
}
4. 重新写LxbSpringApplicationContext, 将bean的定义放到beanDefinitionMap中
public class LxbSpringApplicationContext {
    // 配置类
    private Class config;
    // 存放单例bean的map
    private final ConcurrentHashMap<String, Object> singleton = new ConcurrentHashMap<>();
    // 存放bean元数据的map
    private final ConcurrentHashMap<String, BeanDefinition> beanDefinitionMap = new ConcurrentHashMap<>();

    // 返回单例map
    public ConcurrentHashMap<String, Object> getIoc() {
        return singleton;
    }

    // 返回bean根据 id
    public Object getBean(String bean) {
        return singleton.get(bean);
    }

    // 将从包中扫描类的步骤封装起来, 封装到这个方法中
    public void LoaderResourceByConfig(Class ClassConfig) {
        this.config = ClassConfig;
        ComponentScan component = (ComponentScan) config.getDeclaredAnnotation(ComponentScan.class);
        String path = component.value();
        path = path.replace(".", "/");
        System.out.println("扫描的路径是 : " + path);
        System.out.println("=====================================================");
        ClassLoader classLoader = LxbSpringApplicationContext.class.getClassLoader();
        URL resource = classLoader.getResource(path);
        //System.out.println(resource);
        File ComponentFile = new File(resource.getFile());
        if (ComponentFile.isDirectory()) {
            File[] files = ComponentFile.listFiles();
            for (File file : files) {
                String classPath = file.getAbsolutePath();
                System.out.println("类的绝对路径是 : " + classPath);

                if (classPath.endsWith(".class")) {
                    String className = classPath.substring(classPath.lastIndexOf("\\") + 1, classPath.indexOf(".class"));
                    String classFullPath = path.replace("/", ".") + "." + className;
                    System.out.println("类的全路径是 :" + classFullPath + ", 类名是 :" + className);

                    try {
                        Class<?> clazz = Class.forName(classFullPath);

                        if (clazz.isAnnotationPresent(Component.class)) {
                            Component beanId = clazz.getDeclaredAnnotation(Component.class);
                            String id = beanId.value();
                            if (id == null || "".equals(id)) {
                                id = className.substring(0, 1).toLowerCase() + className.substring(1);
                            }
                            //System.out.println(value);
                            System.out.println("是一个 bean = " + clazz);


                            BeanDefinition beanDefinition = new BeanDefinition();
                            beanDefinition.setClazz(clazz);
                            if (clazz.isAnnotationPresent(Scope.class)) {
                                Scope scope = clazz.getDeclaredAnnotation(Scope.class);
                                beanDefinition.setScope(scope.value());

                            } else {
                                beanDefinition.setScope("singleton");
                            }
                            beanDefinitionMap.put(id, beanDefinition);
                        } else {
                            System.out.println("不是一个 bean = " + clazz);
                        }
                        System.out.println("=====================================================");
                    } catch (ClassNotFoundException e) {
                        throw new RuntimeException(e);
                    }
                }
            }

        }

    }

    // 构造器, 参数是配置类
    public LxbSpringApplicationContext(Class ClassConfig) {
        LoaderResourceByConfig(ClassConfig);
    }
}
结果 :

实现任务阶段 3- 初始化 bean 单例池,并完成 getBean 方法 , createBean 方法
1. 将bean根据单例还是多例进行实例化, 将单例进行实例化放到singletonMap中, 多例不进行实例化
// 返回bean根据 id
public Object getBean(String bean) {
    if(beanDefinitionMap.containsKey(bean)) {
        BeanDefinition beanDefinition = beanDefinitionMap.get(bean);
        if(beanDefinition.getScope().equals("singleton")) {
            return singletonMap.get(bean);
        } else {
            return create(bean);
        }
    } else {
        throw new NullPointExecption("不存在的bean");
    }
}


public Object createBean(BeanDefinition beanDefinition) {
    Class clazz = beanDefinition.getClazz();
    try {
        return clazz.newInstance();
    } catch (InstantiationException | IllegalAccessException e) {
        throw new RuntimeException(e);
    }
}
2. 测试类Test
public class SpringTest {
    @Test
    public void ConfigTest() {

        LxbSpringApplicationContext ioc = new LxbSpringApplicationContext(LxbSpringConfig.class);


        System.out.println("=====================================================");
        ConcurrentHashMap<String, Object> beans = ioc.getIoc();
        Enumeration<String> keys = beans.keys();
        while (keys.hasMoreElements()) {
            String id = keys.nextElement();
            System.out.println(beans.get(id));
        }
    }
}
结果 :
实现任务阶段 4- 完成依赖注入
1. 在annotation中创建注解Autowired
@Retention(RetentionPolicy.RUNTIME)
@Target({ElementType.METHOD, ElementType.FIELD})
public @interface Autowired {
//一个属性 required ,这里我们就不讲了,也比较简单, 有兴趣同学们作为课后加入
//String required() default "true";
}
2. 修改component中的MonsterService和MonsterDao
@Component("monsterDao")
public class MonsterDao {
    public void hi() {
        System.out.println("喵喵喵~~~");
    }
}
@Scope("prototype")
@Component("monsterService")
public class MonsterService {
@Autowired
private MonsterDao monsterDao;
public void m1() {
monsterDao.hi();
}
}3. 修改LxbSpringApplicationContext, 中的createBean方法, 在实例化对象的时候将域中需要注入的属性进行注入
public Object createBean(BeanDefinition beanDefinition) {
Class clazz = beanDefinition.getClazz();
Object instance = null;
try {
instance = clazz.newInstance();
} catch (InstantiationException | IllegalAccessException e) {
throw new RuntimeException(e);
}
Field[] declaredFields = clazz.getDeclaredFields();
for (Field declaredField : declaredFields) {
Object bean = getBean(declaredField.getName());
try {
declaredField.set(instance, bean);
} catch (IllegalAccessException e) {
throw new RuntimeException(e);
}
}
return instance;
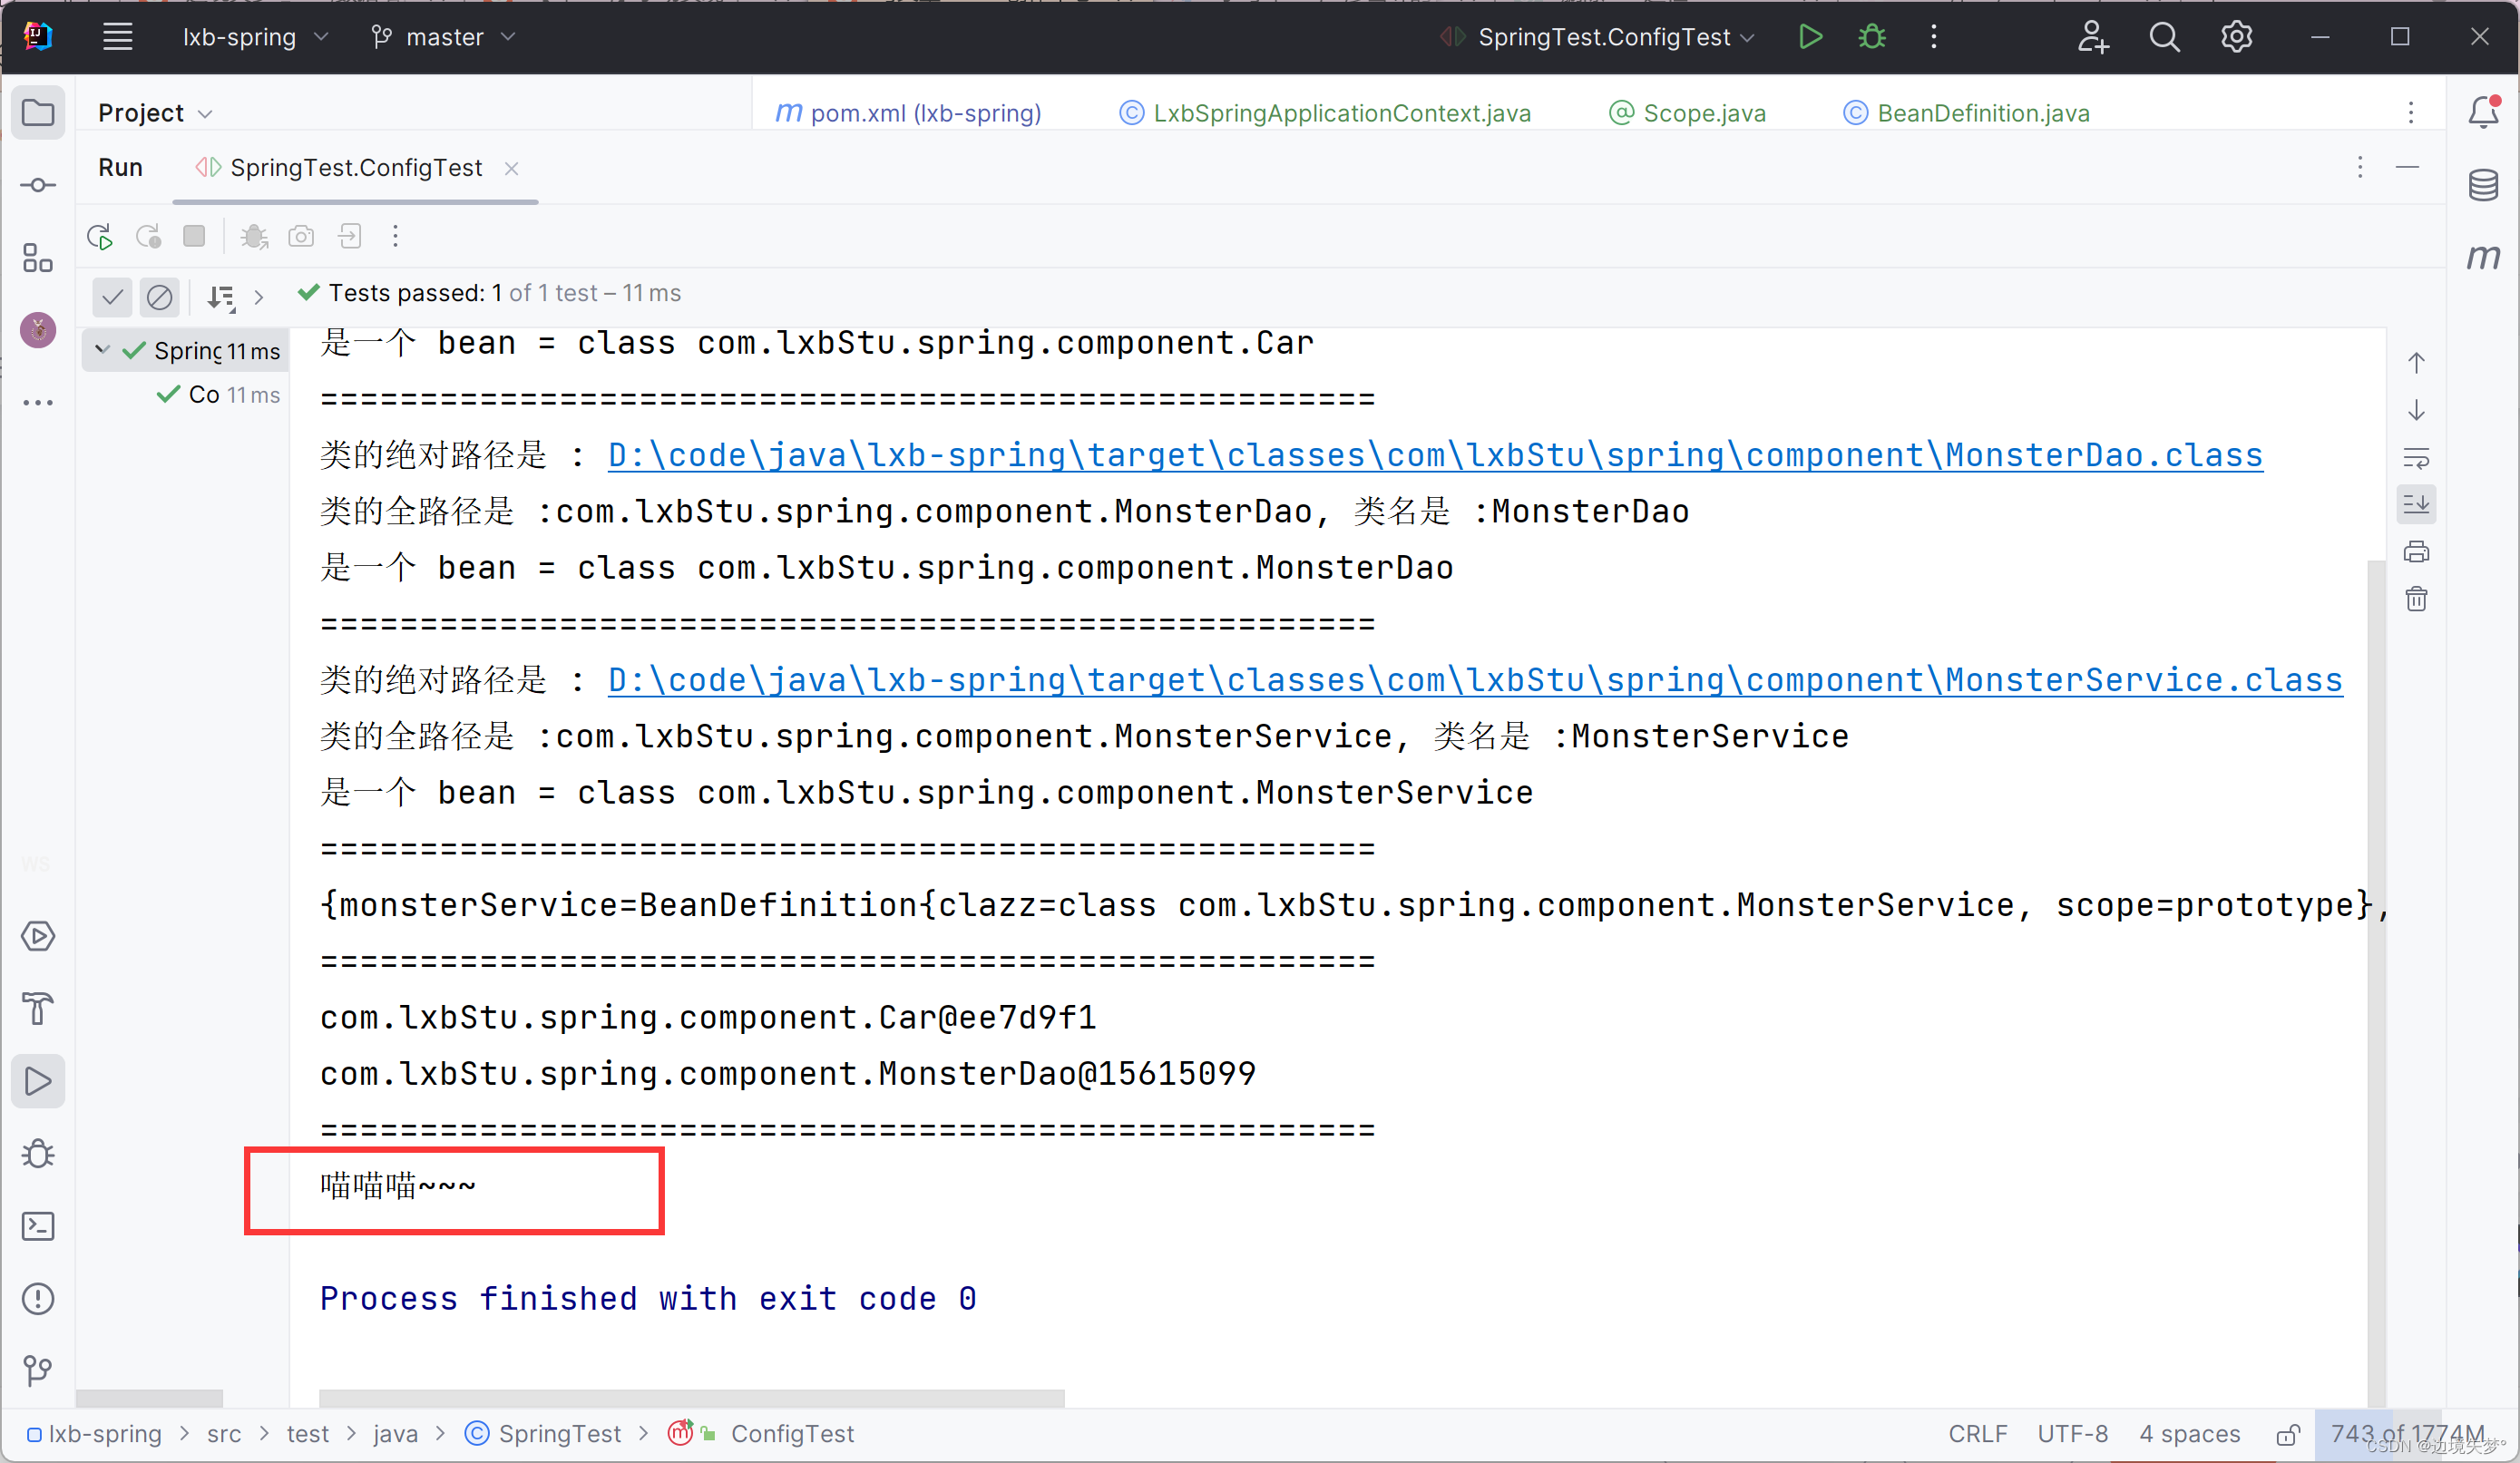
}结果 :

原因分析 :
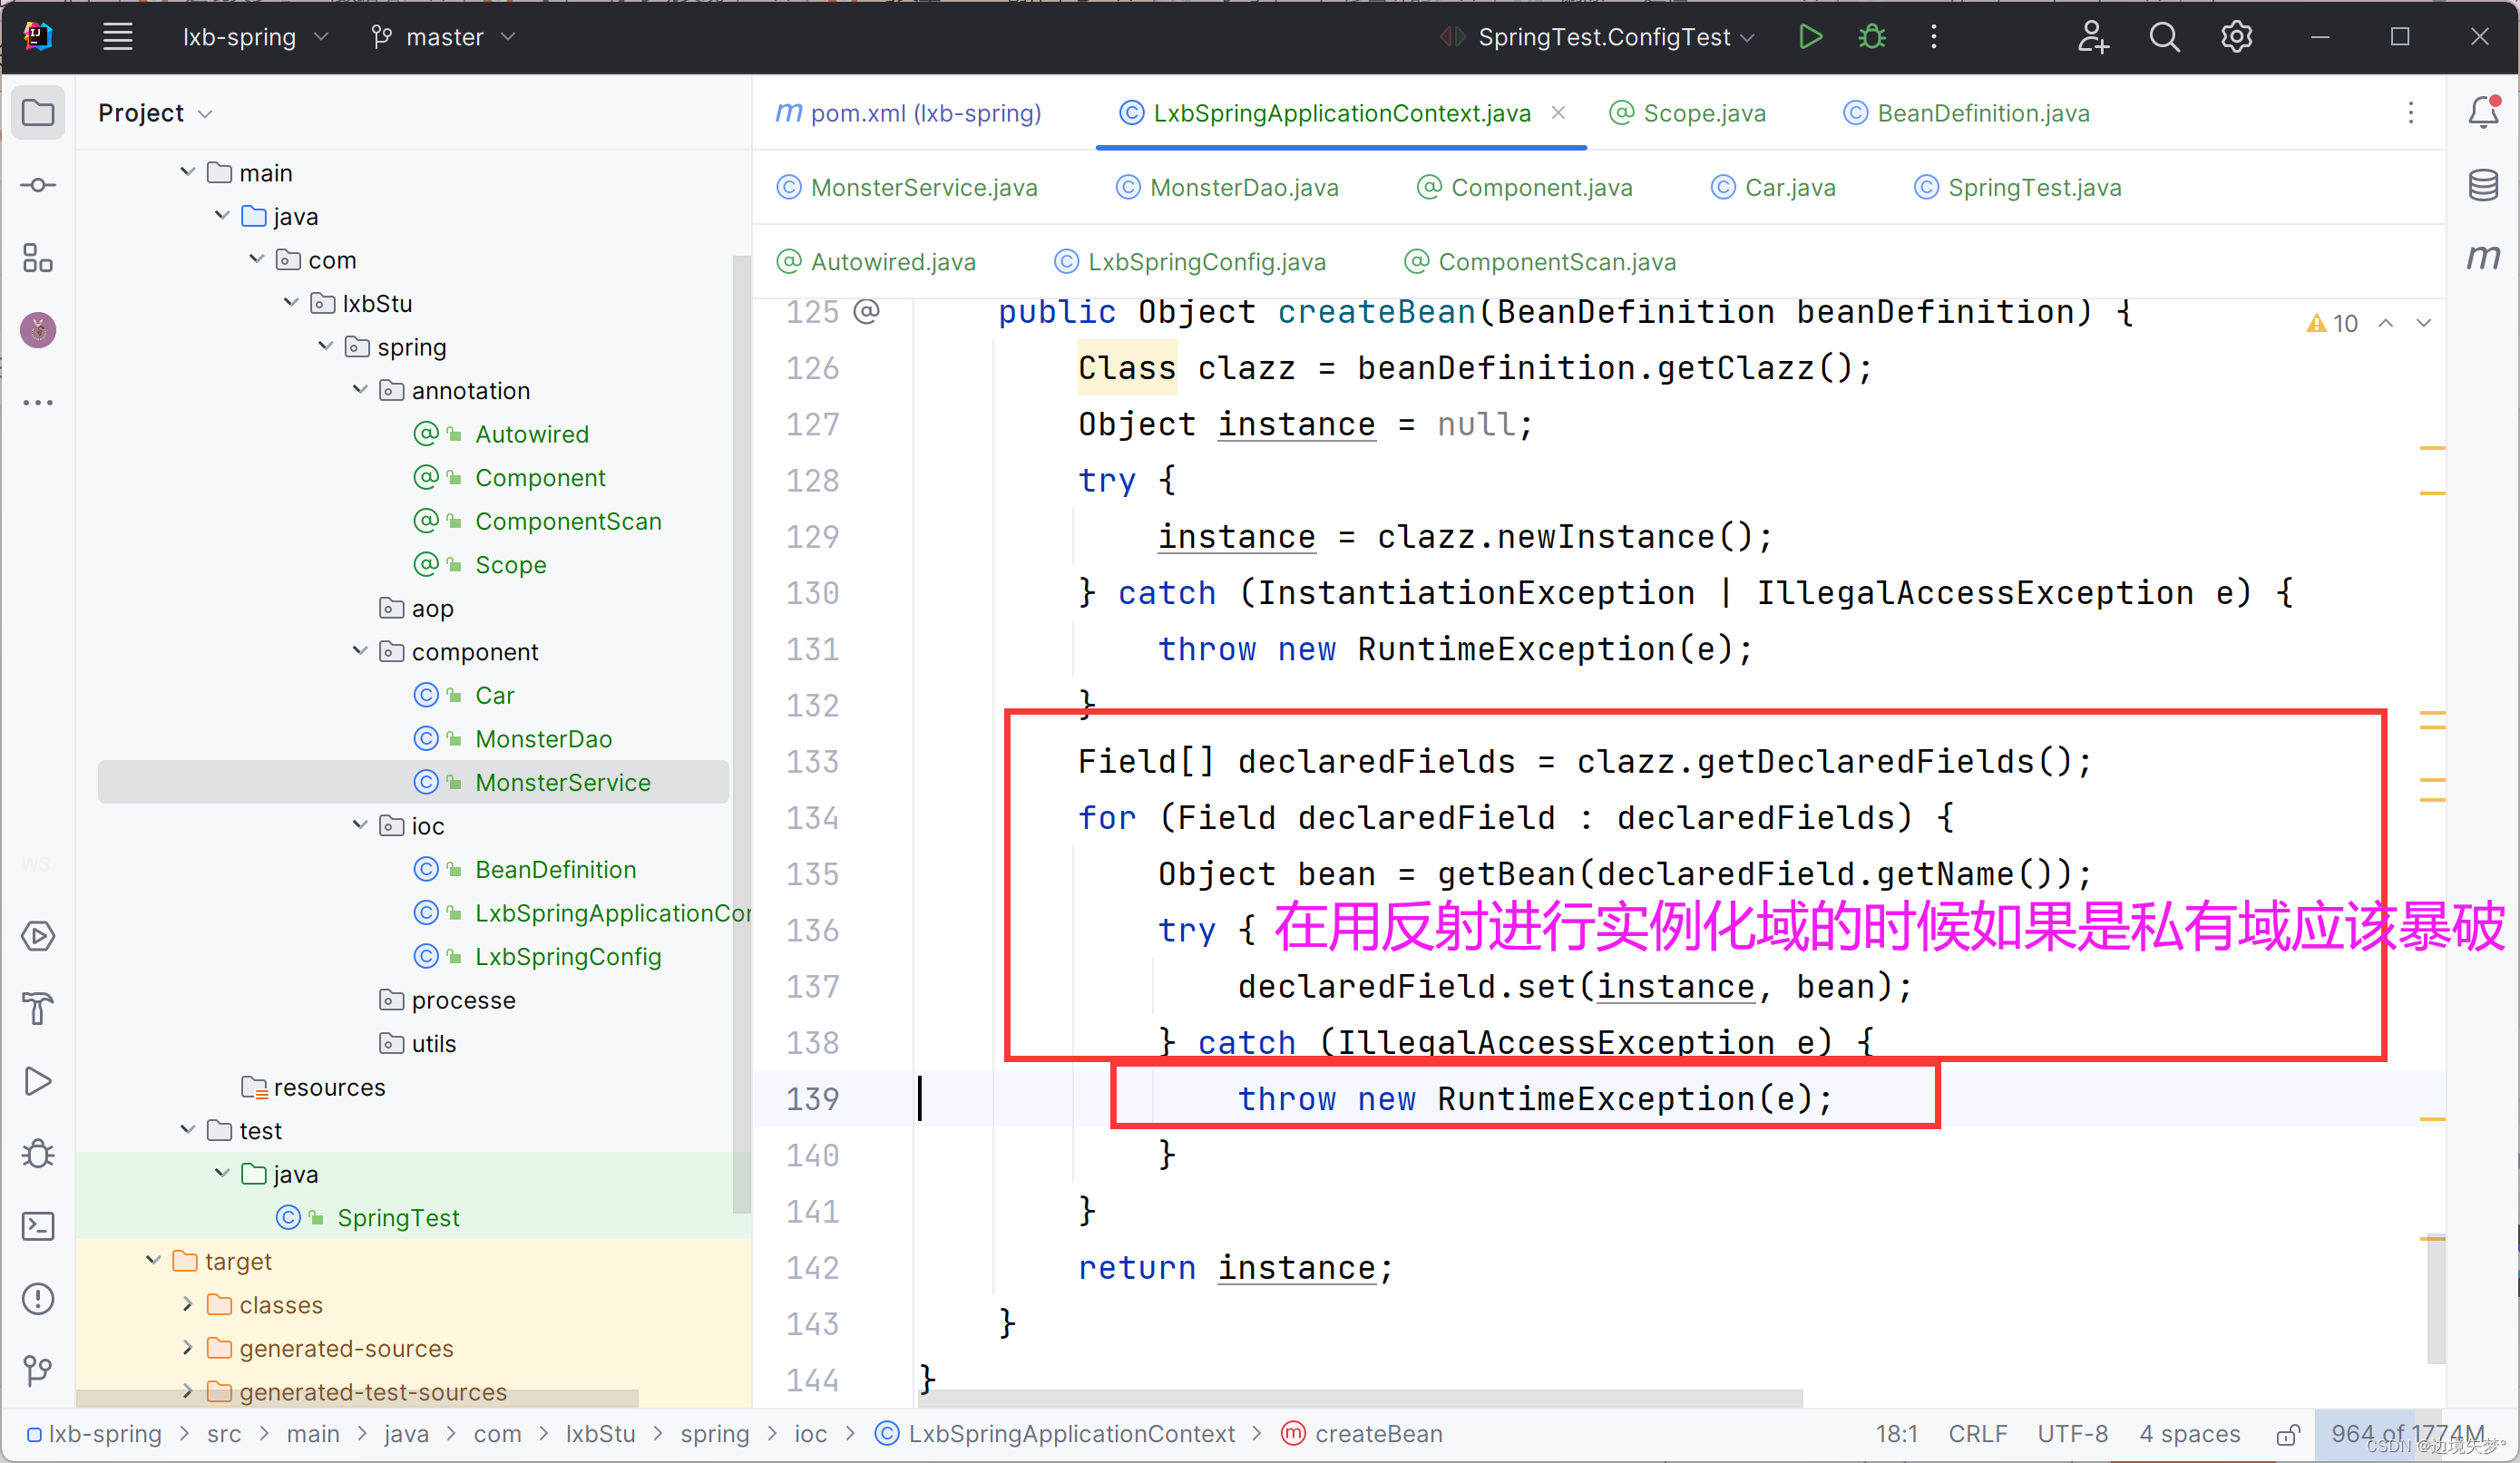
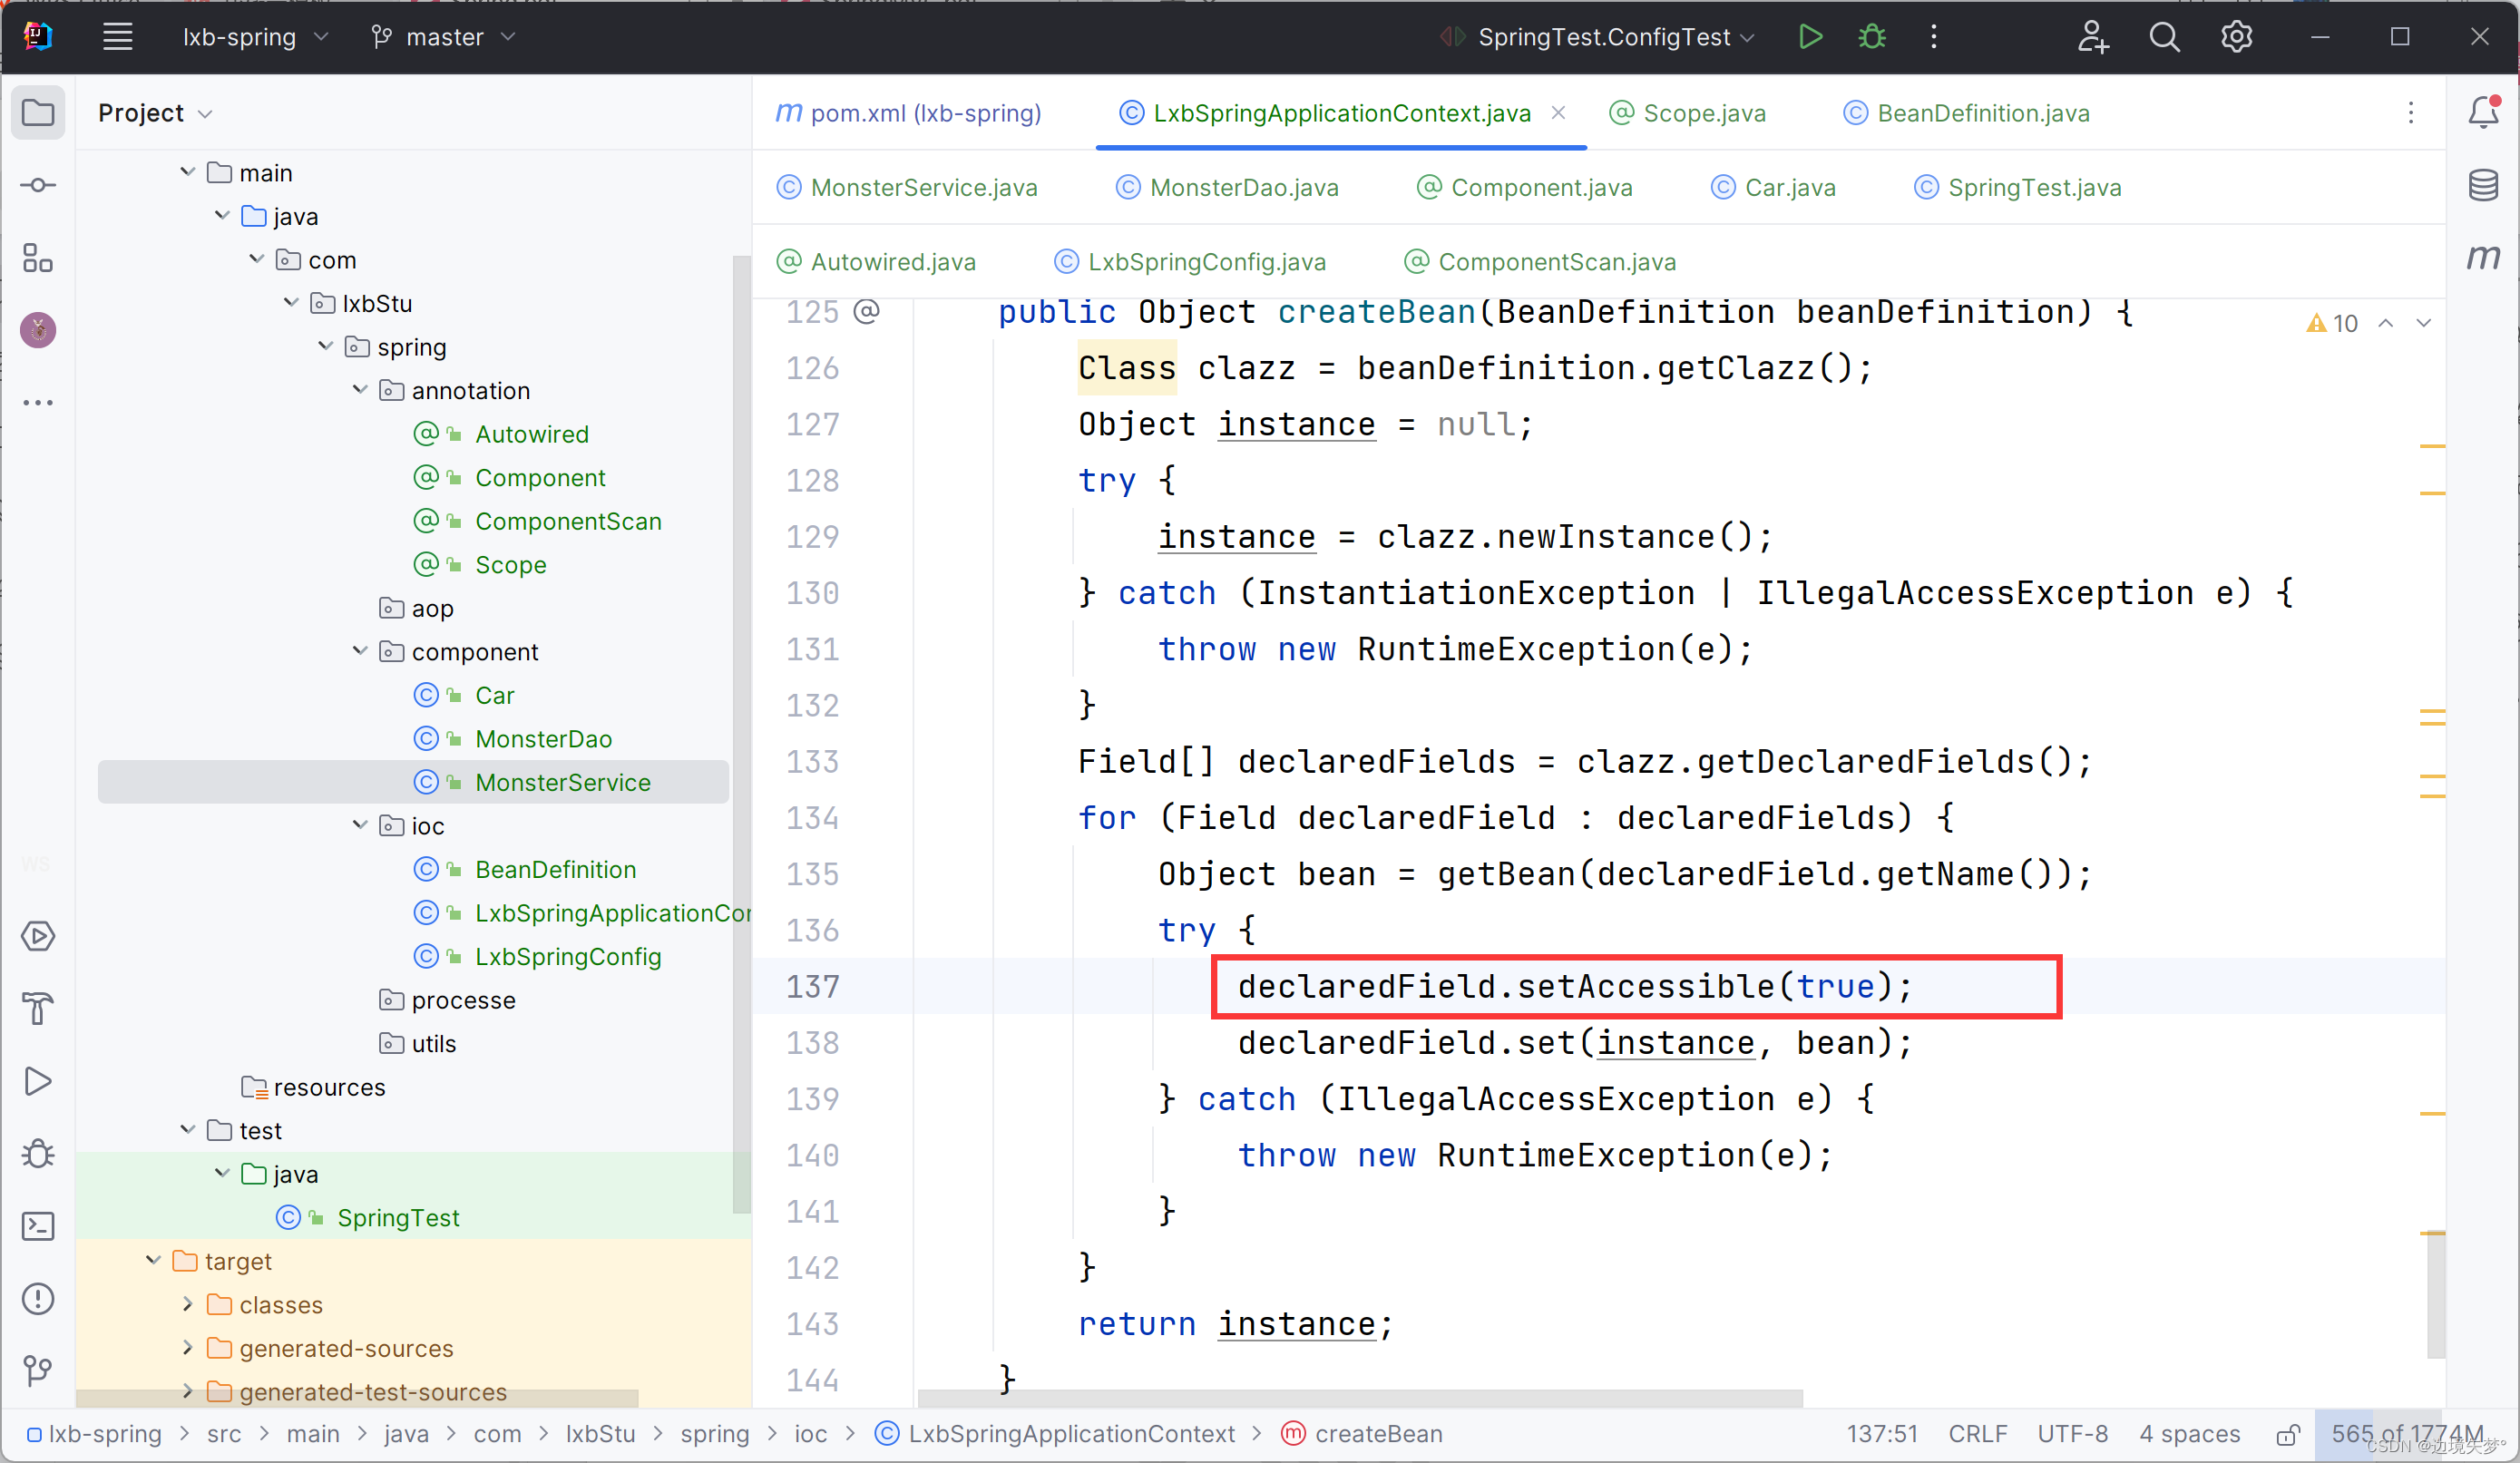
修改如下图 :
结果 :
实现任务阶段 5- bean 后置处理器实现
1. 对于初始化方法, 我们写一个接口InitializingBean, 如果一个类实现了就说明bean含有初始化方法, 反之, 亦然.
public interface InitializingBean {
    void afterPropertiesSet() throws Exception;
}
2. 修改 MonsterDao 类, 实现接口 InitializingBean , 实现它的方法, 让该类有初始化方法
@Component("monsterDao")
public class MonsterDao implements InitializingBean {
    public void hi() {
        System.out.println("喵喵喵~~~");
    }

    /**
     * 就像之前那样, 我们是通过写一个方法在xml中配置属性的时候给初始化的属性进行赋值
     * 初始化方法可有可无, 但是后置处理器是
     * @throws Exception
     */
    @Override
    public void afterPropertiesSet() throws Exception {
        System.out.println("MonsterService 进行初始化, 具体业务由程序员来搞定....");
    }
}
3. 先用简单的步骤测试实现方法的类在create的时候会不会执行初始化方法
public Object createBean(BeanDefinition beanDefinition) {
Class clazz = beanDefinition.getClazz();
Object instance = null;
try {
instance = clazz.newInstance();
} catch (InstantiationException | IllegalAccessException e) {
throw new RuntimeException(e);
}
Field[] declaredFields = clazz.getDeclaredFields();
for (Field declaredField : declaredFields) {
Object bean = getBean(declaredField.getName());
try {
declaredField.setAccessible(true);
declaredField.set(instance, bean);
} catch (IllegalAccessException e) {
throw new RuntimeException(e);
}
}
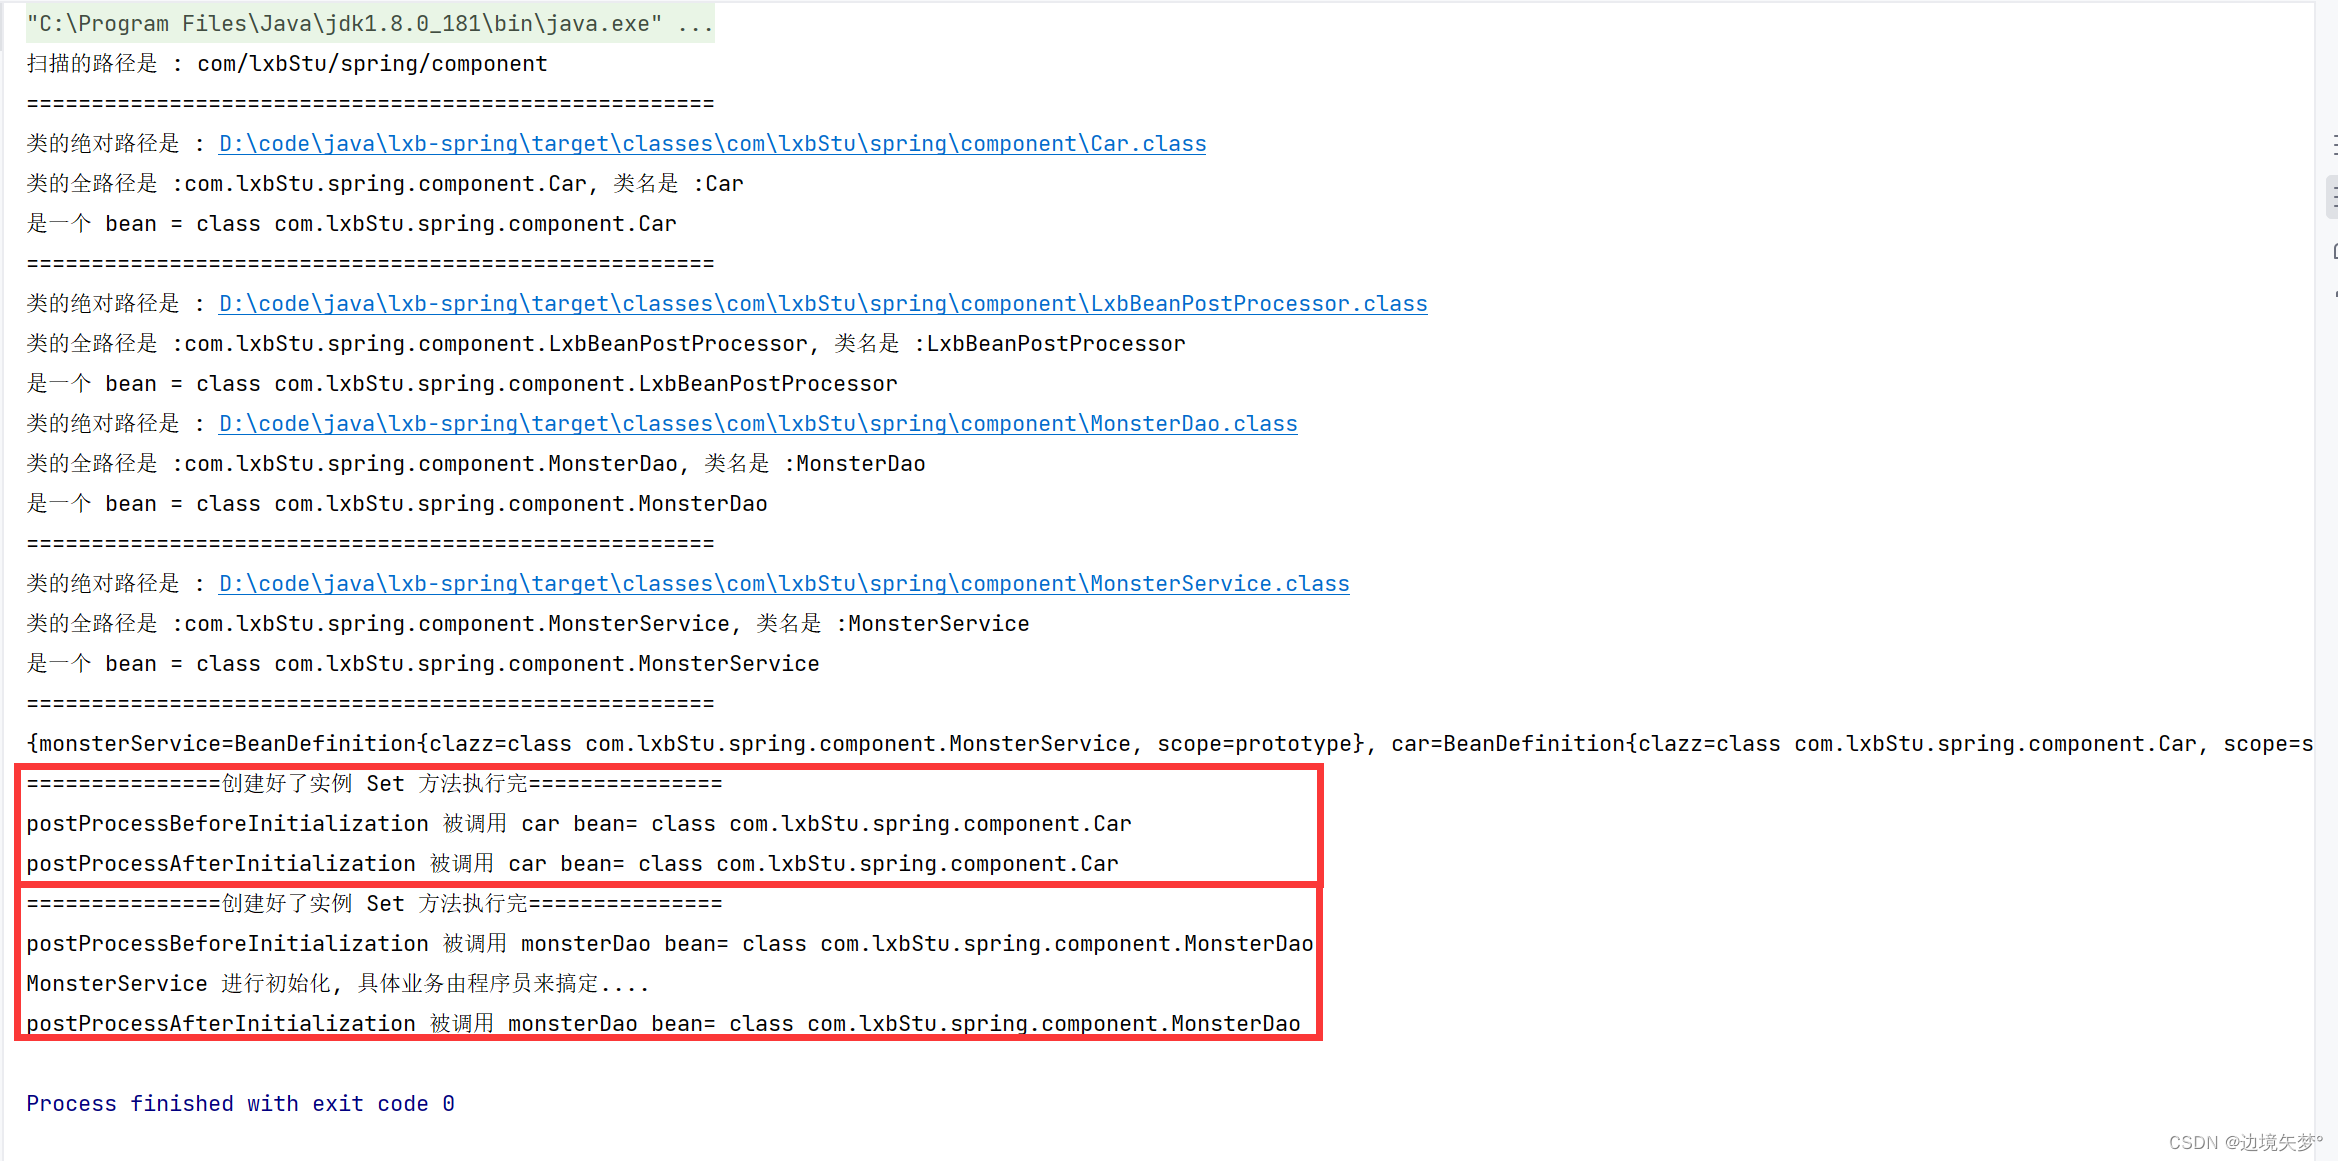
System.out.println("=====================创建好了实例======================");
if(instance instanceof InitializingBean) {
try {
((InitializingBean) instance).afterPropertiesSet();
} catch (Exception e) {
throw new RuntimeException(e);
}
}
return instance;
}结果 :

4. 后置处理器接口的实现, 在processe中进行创建
public interface BeanPostProcessor {
    //bean 初始化前执行的业务
    Object postProcessBeforeInitialization(Object bean, String beanName);

    //bean 初始化后执行的业务
    Object postProcessAfterInitialization(Object bean, String beanName);
}
5. 在component中创建LxbBeanPostProcessor, 用来进行后置处理
@Component
public class LxbBeanPostProcessor implements BeanPostProcessor {
    @Override
    public Object postProcessBeforeInitialization(Object bean, String beanName) {
        System.out.println("postProcessBeforeInitialization 被调用 " + beanName + " bean= " + bean.getClass());
        return bean;
    }

    @Override
    public Object postProcessAfterInitialization(Object bean, String beanName) {
        System.out.println("postProcessAfterInitialization 被调用 " + beanName + " bean= " + bean.getClass());
        return bean;
    }
}
6. 修改ioc的SpringApplicationContext中的扫描方法和createBean() 方法, 在扫描的时候将他们进行实例化并放到beanPostProcessorMap中, 在create的时候调用所有的后置处理器
扫描方法
public void LoaderResourceByConfig(Class ClassConfig) throws RuntimeException {
    this.config = ClassConfig;
    ComponentScan component = (ComponentScan) config.getDeclaredAnnotation(ComponentScan.class);
    String path = component.value();
    path = path.replace(".", "/");
    System.out.println("扫描的路径是 : " + path);
    System.out.println("=====================================================");
    ClassLoader classLoader = LxbSpringApplicationContext.class.getClassLoader();
    URL resource = classLoader.getResource(path);
    //System.out.println(resource);
    File ComponentFile = new File(resource.getFile());
    if (ComponentFile.isDirectory()) {
        File[] files = ComponentFile.listFiles();
        for (File file : files) {
            String classPath = file.getAbsolutePath();
            System.out.println("类的绝对路径是 : " + classPath);

            if (classPath.endsWith(".class")) {
                String className = classPath.substring(classPath.lastIndexOf("\\") + 1, classPath.indexOf(".class"));
                String classFullPath = path.replace("/", ".") + "." + className;
                System.out.println("类的全路径是 :" + classFullPath + ", 类名是 :" + className);

                try {
                    Class<?> clazz = Class.forName(classFullPath);

                    if (clazz.isAnnotationPresent(Component.class)) {
                        Component beanId = clazz.getDeclaredAnnotation(Component.class);
                        String id = beanId.value();
                        if (id == null || "".equals(id)) {
                            id = className.substring(0, 1).toLowerCase() + className.substring(1);
                        }
                        //System.out.println(value);
                        System.out.println("是一个 bean = " + clazz);

                        if(clazz.isAssignableFrom(BeanPostProcessor.class)) {
                            BeanPostProcessor beanPostProcessor = (BeanPostProcessor) clazz.newInstance();
                            beanPostProcessorList.add(beanPostProcessor);
                            continue;
                        }

                        BeanDefinition beanDefinition = new BeanDefinition();
                        beanDefinition.setClazz(clazz);
                        if (clazz.isAnnotationPresent(Scope.class)) {
                            Scope scope = clazz.getDeclaredAnnotation(Scope.class);
                            beanDefinition.setScope(scope.value());

                        } else {
                            beanDefinition.setScope("singleton");
                        }
                        beanDefinitionMap.put(id, beanDefinition);
                    } else {
                        System.out.println("不是一个 bean = " + clazz);
                    }
                    System.out.println("=====================================================");
                } catch (ClassNotFoundException | InstantiationException | IllegalAccessException e) {
                    throw new RuntimeException(e);
                }
            }
        }

    }

}
createBean()方法
public Object createBean(String beanName, BeanDefinition beanDefinition) {
        Class clazz = beanDefinition.getClazz();
        Object instance = null;
        try {
            instance = clazz.newInstance();
        } catch (InstantiationException | IllegalAccessException e) {
            throw new RuntimeException(e);
        }
        Field[] declaredFields = clazz.getDeclaredFields();
        for (Field declaredField : declaredFields) {
            Object bean = getBean(declaredField.getName());
            try {
                declaredField.setAccessible(true);
                declaredField.set(instance, bean);
            } catch (IllegalAccessException e) {
                throw new RuntimeException(e);
            }
        }
        System.out.println("===============创建好了实例 Set 方法执行完===============");


        for (BeanPostProcessor beanPostProcessor : beanPostProcessorList) {
            Object temp = beanPostProcessor.postProcessBeforeInitialization(instance, beanName);
            if(temp != null) {
                instance = temp;
            }
        }
        if(instance instanceof InitializingBean) {
            try {
                ((InitializingBean) instance).afterPropertiesSet();
            } catch (Exception e) {
                throw new RuntimeException(e);
            }
        }
        for(BeanPostProcessor beanPostProcessor : beanPostProcessorList) {
            Object temp = beanPostProcessor.postProcessAfterInitialization(instance, beanName);
            if(temp != null) {
                instance = temp;
            }
        }
        return instance;
    }
结果 :
实现任务阶段 6- AOP 机制实现
1. 在component中创建SmartAnimalable, 以它为接口, 我们写类去实现它, 用动态代理实现切面编程
public interface SmartAnimalable {
    float getSum(float i, float j);

    float getSub(float i, float j);
}
2. 在component中创建SmartDog类去实现SmartAnimalable
@Component("smartDog")
public class SmartDog implements SmartAnimalable{
    @Override
    public float getSum(float i, float j) {
        float result = i + j;
        System.out.println("getSum() 方法内部打印 result= " + result);
        return result;
    }

    @Override
    public float getSub(float i, float j) {
        float result = i - j;
        System.out.println("getSub() 方法内部打印 result= " + result);
        return result;
    }
}
3. 在annotation中创建注解Aspect, After, Before
@Retention(RetentionPolicy.RUNTIME)
@Target(ElementType.METHOD)
public @interface After {
    String value();
}
@Retention(RetentionPolicy.RUNTIME)
@Target(ElementType.METHOD)
public @interface Before {
String value();
}@Retention(RetentionPolicy.RUNTIME)
@Target(ElementType.TYPE)
public @interface Aspect {
String value() default "";
}4. 在component中创建SmartAnimalAspect该类就是切面类, 对注解了的类的方法进行切面
@Aspect
@Component
public class SmartAnimalAspect {
    @Before("execution com.lxbStu.spring.component.SmartDog getSum")
    public void showBeginLog() {
        System.out.println("前置通知");
    }

    @After("execution com.lxbStu.spring.component.SmartDog getSum")
    public void showSuccessEndLog() {
        System.out.println("返回通知");
    }
}
5. 在aop中创建一个工具类, 用于存放aspect对应那个类的那个方法的关系, 为了简化操作将该类的属性和方法设置为静态
public class AspectContainer {
    private static final ConcurrentHashMap<Class, String[]> aspectJMap = new ConcurrentHashMap<>();
    public static void add(Class clazz, String[] value) {
        aspectJMap.put(clazz, value);
    }
    public static ConcurrentHashMap<Class, String[]> getAspectJ() {
        return aspectJMap;
    }
}
6. 修改LxbSpringApplicationContext类中的LoaderResourceByConfig()方法在扫描的时候将切面类的信息封装到AspectContainer中的Map里面, 为了方便之后后置处理器的postProcessAfterInitialization()方法之后执行时直接查找是否某个类可以用到切面类
public void LoaderResourceByConfig(Class ClassConfig) throws RuntimeException {
    this.config = ClassConfig;
    ComponentScan component = (ComponentScan) config.getDeclaredAnnotation(ComponentScan.class);
    String path = component.value();
    path = path.replace(".", "/");
    System.out.println("扫描的路径是 : " + path);
    ClassLoader classLoader = LxbSpringApplicationContext.class.getClassLoader();
    URL resource = classLoader.getResource(path);
    //System.out.println(resource);
    File ComponentFile = new File(resource.getFile());
    if (ComponentFile.isDirectory()) {
        File[] files = ComponentFile.listFiles();
        for (File file : files) {
            System.out.println("=====================================================");
            String classPath = file.getAbsolutePath();
            System.out.println("类的绝对路径是 : " + classPath);

            if (classPath.endsWith(".class")) {
                String className = classPath.substring(classPath.lastIndexOf("\\") + 1, classPath.indexOf(".class"));
                String classFullPath = path.replace("/", ".") + "." + className;
                System.out.println("类的全路径是 :" + classFullPath + ", 类名是 :" + className);

                try {
                    Class<?> clazz = Class.forName(classFullPath);

                    if (clazz.isAnnotationPresent(Component.class)) {
                        Component beanId = clazz.getDeclaredAnnotation(Component.class);
                        String id = beanId.value();
                        if (id == null || "".equals(id)) {
                            id = className.substring(0, 1).toLowerCase() + className.substring(1);
                        }
                        //System.out.println(value);
                        if(clazz.isAnnotationPresent(Aspect.class)) {
                            Method[] methods = clazz.getDeclaredMethods();
                            for (Method method : methods) {
                                String classAndMethod = null;
                                if(method.getDeclaredAnnotation(Before.class) != null) {
                                    Before before = method.getDeclaredAnnotation(Before.class);
                                    classAndMethod = before.value();
                                }

                                if(method.getDeclaredAnnotation(After.class) != null) {
                                    After after = method.getDeclaredAnnotation(After.class);
                                    classAndMethod = after.value();
                                }
                                if(classAndMethod != null) {
                                    // 我只需要把aspect方法里的注解的信息进行分析就可以了, 至于aspect只需要将它的对象的路径放在字符串数组中即可
                                    String[] split = classAndMethod.split(" ");
                                    Class<?> key = Class.forName(split[1]);
                                    String methodName = split[2];
                                    String[] value = new String[] {methodName, classFullPath};
                                    // 封装为 = 类路径 + 方法
                                    AspectContainer.add(key, value);
                                    break;
                                }
                            }
                            System.out.println("是一个 AspectJ = " + clazz);
                            continue;
                        }

                        // 这行很重要
                        if(BeanPostProcessor.class.isAssignableFrom(clazz)) {
                            BeanPostProcessor beanPostProcessor = (BeanPostProcessor) clazz.newInstance();
                            beanPostProcessorList.add(beanPostProcessor);
                            System.out.println("是一个 BeanPostProcessor = " + clazz);
                            continue;
                        }

                        BeanDefinition beanDefinition = new BeanDefinition();
                        beanDefinition.setClazz(clazz);
                        if (clazz.isAnnotationPresent(Scope.class)) {
                            Scope scope = clazz.getDeclaredAnnotation(Scope.class);
                            beanDefinition.setScope(scope.value());

                        } else {
                            beanDefinition.setScope("singleton");
                        }
                        beanDefinitionMap.put(id, beanDefinition);
                        System.out.println("是一个 bean = " + clazz);
                    } else {
                        System.out.println("不是一个 bean = " + clazz);
                    }
                } catch (ClassNotFoundException | InstantiationException | IllegalAccessException e) {
                    throw new RuntimeException(e);
                }
            }
        }

    }

}
7. 修改component中的LxbBeanPostProcessor类后置处理器中的postProcessAfterInitialization() 方法, 保证在后置处理器的after方法中返回代理对象, 并将执行逻辑进行修改
@Override
public Object postProcessAfterInitialization(Object bean, String beanName) {
    System.out.println("postProcessAfterInitialization 被调用 " + beanName + " bean= " + bean.getClass());

    ConcurrentHashMap<Class, String[]> aspectJ = AspectContainer.getAspectJ();
    String[] strings = aspectJ.get(bean.getClass());
    if(strings != null) {

        Object proxyInstance = Proxy.newProxyInstance(LxbBeanPostProcessor.class.getClassLoader(), bean.getClass().getInterfaces(), new InvocationHandler() {
                    @Override
                    public Object invoke(Object proxy, Method method, Object[] args) throws Throwable {
                        Object result = null;
                        if (strings[0].equals(method.getName())) {
                            Class<?> clazz = Class.forName(strings[1]);
                            Method[] methods = clazz.getDeclaredMethods();
                            Method before = SpringUtils.FindMethodByName(methods, "showBeginLog");
                            before.invoke(clazz.newInstance());

                            result = method.invoke(bean, args);

                            Method after = SpringUtils.FindMethodByName(methods, "showSuccessEndLog");
                            after.invoke(clazz.newInstance());
                        } else {
                            result = method.invoke(proxy, args);
                        }
                        return result;
                    }
                });
        return proxyInstance;
    }
    return bean;
}
8. 测试类
public class SpringTest {
    @Test
    public void ConfigTest() {

        LxbSpringApplicationContext ioc = new LxbSpringApplicationContext(LxbSpringConfig.class);


        System.out.println("=====================================================");

        //ConcurrentHashMap<String, Object> beans = ioc.getIoc();
        //Enumeration<String> keys = beans.keys();
        //while (keys.hasMoreElements()) {
        //    String id = keys.nextElement();
        //    System.out.println(beans.get(id));
        //}

        //MonsterService monsterService = (MonsterService) ioc.getBean("monsterService");
        //monsterService.m1();

        //ConcurrentHashMap<Class, String[]> aspectJ = AspectContainer.getAspectJ();
        //Enumeration<Class> keys = aspectJ.keys();
        //while(keys.hasMoreElements()) {
        //    Class aClass = keys.nextElement();
        //    String[] strings = aspectJ.get(aClass);
        //    System.out.println(Arrays.toString(strings));
        //}

        SmartAnimalable bean = (SmartAnimalable) ioc.getBean("smartDog");
        float sum = bean.getSum(1, 9);

    }
}
结果 :

最后项目的结是 :


